


Apple Mail
In these instructions we will show how to set up the Apple Mail program to send and receive email for the Brand X Network.
![]()
Apple Mail is the program that comes for free with your Mac. The icon for it is a little postage stamp with some sort of flying bird on it.
Creating a new account
Start up the Mail program. The startup screen should look something like this:
![]()
Now, from the Mail program's File menu at the top of your screen choose "Add Account".
We are going to create a new account.

Our setup is not similar to any of those other companies, so select "Add Other Mail Account".
On the next screen we will enter the settings for checking email.
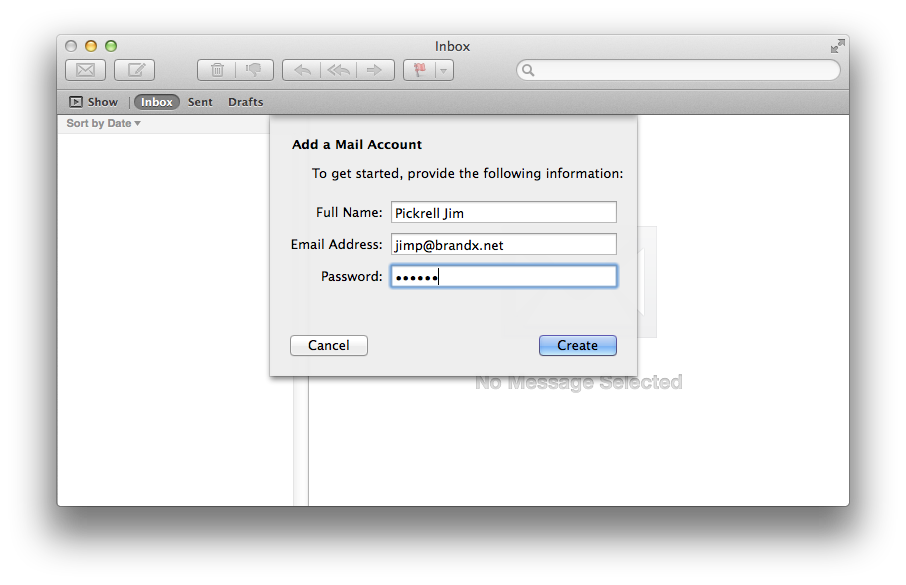
For the "Full Name" you can just put your human name. The email address and password are the settings you got from us when you set up your email account. Please note that the username and password for sending, and receiving mail are not the same. In this box we are entering the settings for receiving mail.
Now click "Create".
The program will come back and say "Account must be manually configured". That's fine. Click "Next".
On the next screen we will enter our incoming mail settings.
Account Type is "IMAP"
(POP3 works too, but Imap is more popular.)
The mail server is mail.brandx.net
The username is the first part of your email address, the part before the "@" symbol.
The password is the one you were given for incoming email.
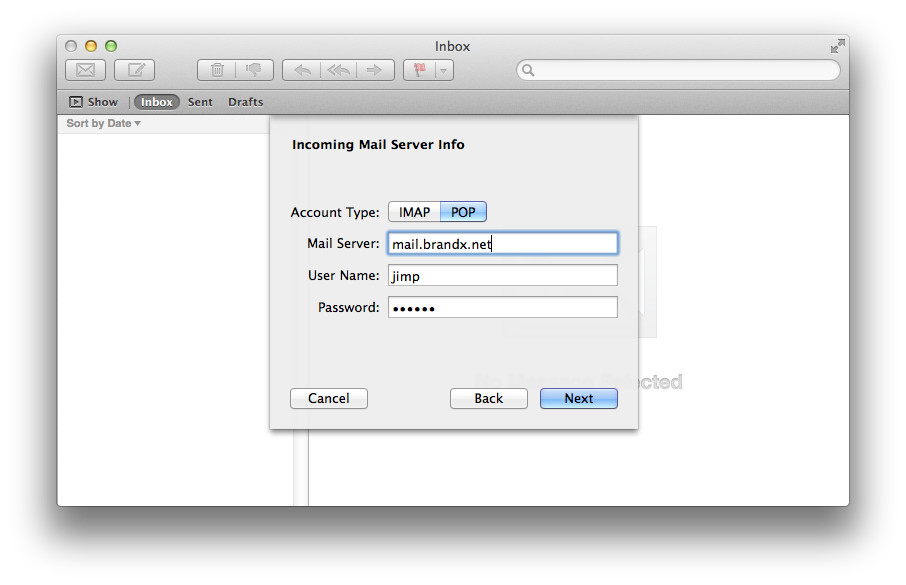
Now click "Next".
You may see an ominous looking warning message:
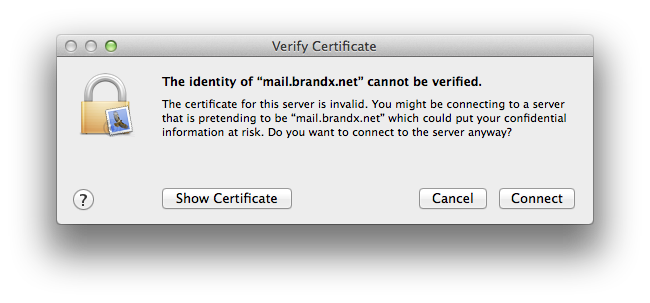
This just means that we made our own security certificate instead of buying one from Verisign. We feel Verisign is unfairly profiting from technology developed at taxpayer expense. The software for creating certificates is public domain and you and I paid for this. So we refuse to pay them to use it.
Instead of paying Verisign to authorize the certificate, you can go ahead and approve it yourself. Here's how you do this.
Hit "Show Certificate". You will see this window:
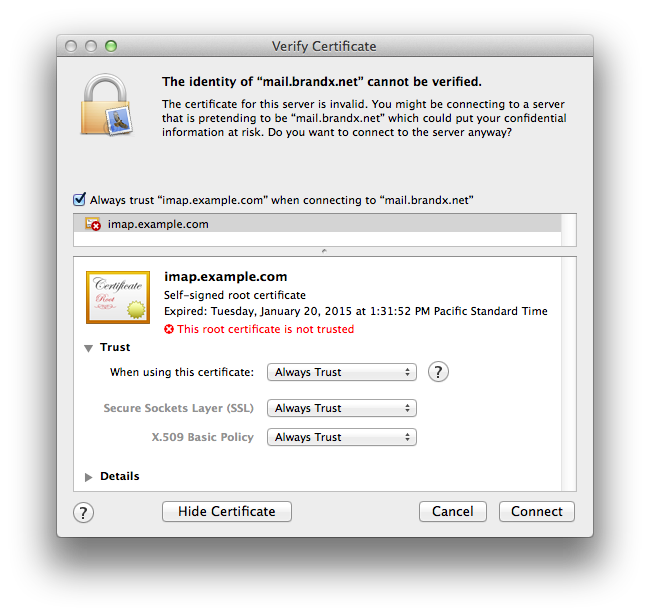
I have selected here "Always trust" near the top of the screen, and below under "Trust" I have selected "Always Trus". The point is, you selected the server, it identified itself as what you expected, and there is no real possibility that some other email server is impersonating us.
Knowing personlly who you are dealing with is better security than a commercially authorized "certificate". And the certificate itself is mathematically valid, it's just the Verisign stamp of approval that is missing.
Apple also signs its own certificates, so we are in good company in making this decision.
Hit "Connect".
This will take us to the window for "Outgoing Mail Server Info".
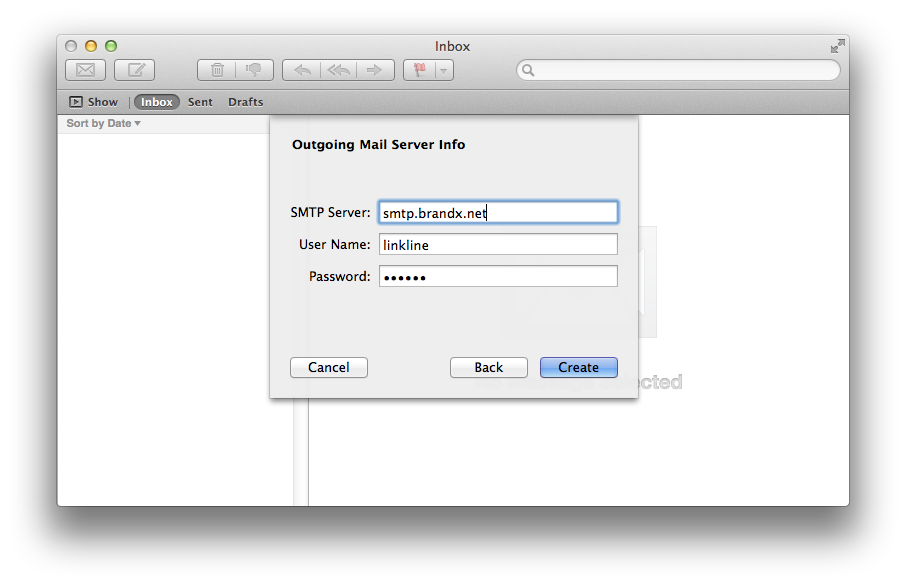
Here you enter the outgoing mail server - smtp.brandx.net - and the outgoing mail username and password. Note that these are not the same as the incoming username and password. You won't be able to guess these. You will need to get them from support at Brand X Internet.
Click "Create".
The computer will attempt to sign in. It will not succeed, because it doesn't have enough informtaion.
You will see the message "Additional account information required."
Click "Next".
This will take you to the "Outgoing Mail server Info" window
Port number is 10025 and Authentication type is Password.
Be sure that "USE SSL" is not clicked (OFF).
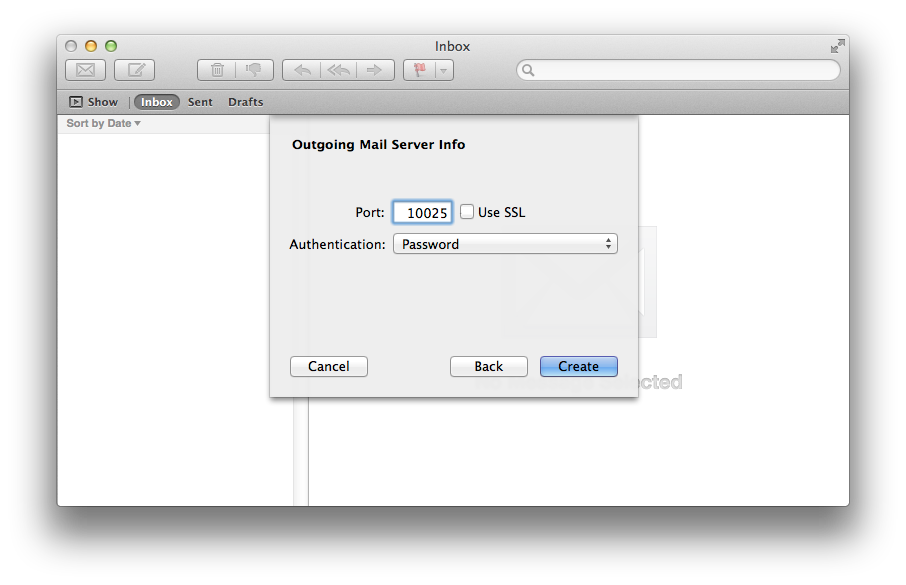
Click "Create"
That's it. If you set things up correctly, you should be good to go.
Testing
We will test first by sending an email to ourselves.
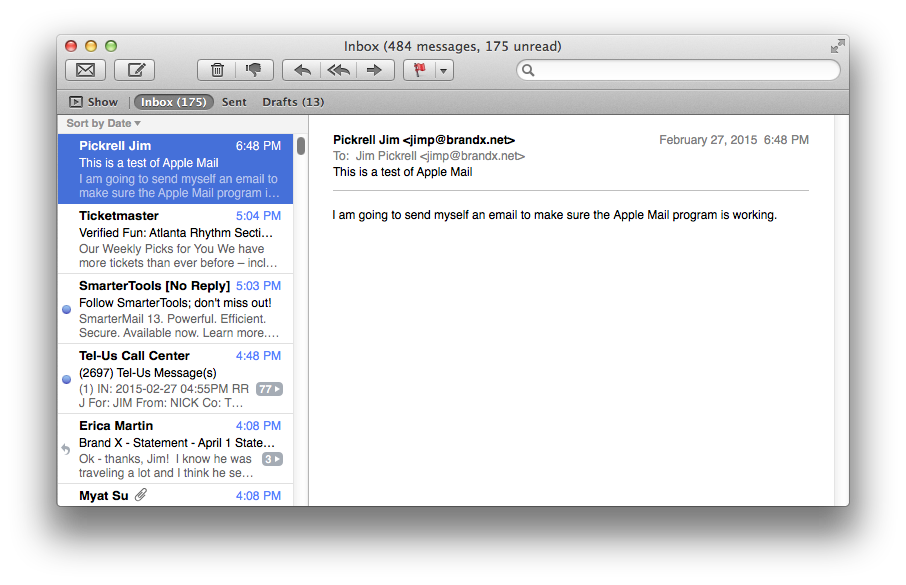
Then wait a few minutes and check the email.
Here it is...
A better test is to send email to someplace outside the network, such as a friend's account at Gmail or Yahoo.
If that gets through, then you know email is set up correctly.
Problems - General
The most common problem is a misspelled password. Usernames are all lower case. Passwords are case sensitive.
If you set up emal with a mistake in the outgoing settings, outgoing mail can jam and then nothing will work. You may have to delete your outgoing mail to make things work.
Make sure you have a good username and password for the outgoing mail. You cannot guess these, you must get them from Brand X Internet.
Sending Problems
This is some additional information for people who are having trouble sending mail.
We have two outgoing mail servers, smtp.brandx.net and mail.brandx.net. Each of them requires a username and password for sending. They do not share the same password file, which means, if you are set up on one you may or may not be set up on the other. There is no charge to be set up for sending but you have to ask.
Using smtp.brandx.net
As of 4/4/2017 the latest version of Apple Mail can be set up for sending via smtp.brandx.net as follows:
Mail -> Preferences
From the page that comes up, select "Outgoing Mail Server" set to "smtp.brandx.net" and "TLS" set to "OFF" as shown below.
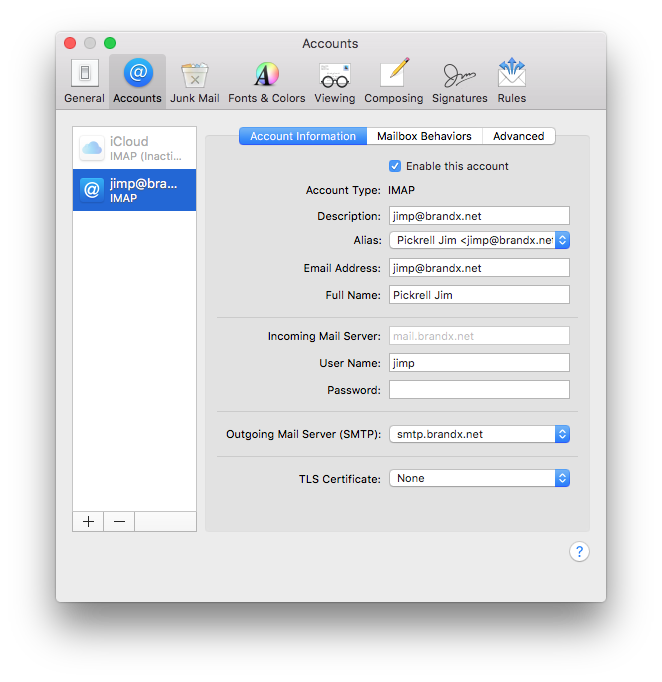
Now, where it says "Outgoing Mail Server" select "Edit Smtp Server List" from the dropdown.
That will take you to the Smtp Server page, which you can set up as shown below.
Port = 10025
Use SSL = unchecked
Authentication = Password
Allow insecure authentication = checked
My username is "jimp" but yours will almost certainly be something else. If you are not sure contact us and ask..
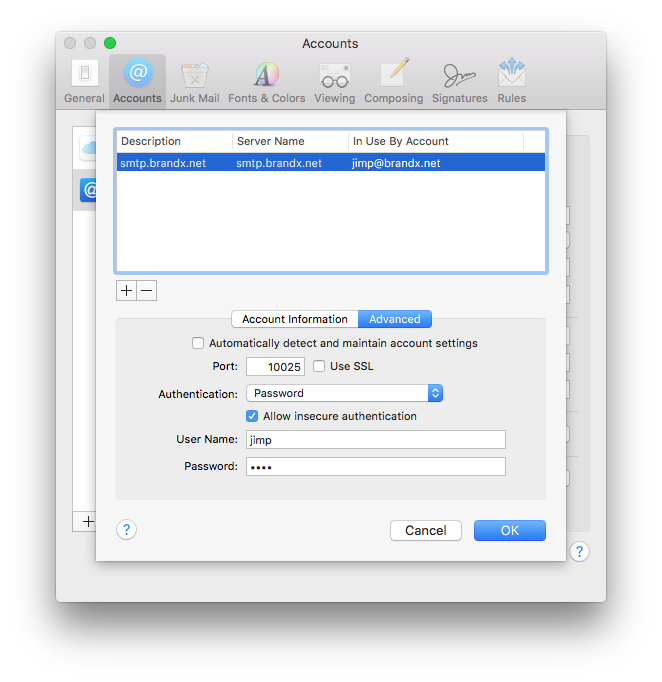
Now select "OK" to save the changes.
Next we will test.
Compose a new mail. I've created one that goes to two destinations, one local, and one on gmail. You will want to use your own.
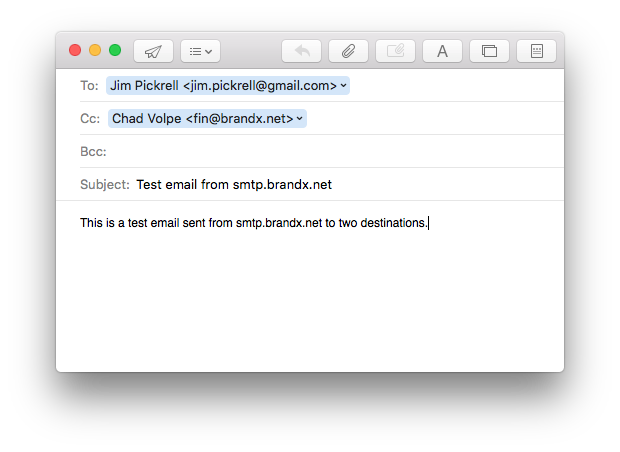
A moment later my test mail arrived at Gmail, so all is good.
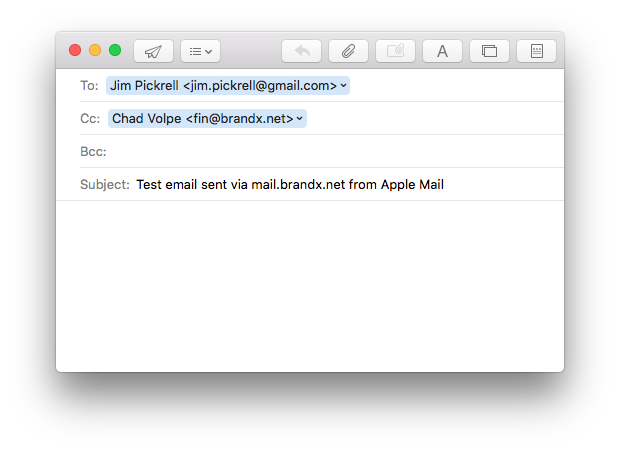
Using mail.brandx.net
I just set up an outgoing mail account for smtp.brandx.net. Now I'm going to do the same thing using a different mail server, mail.brandx.net. Remember, the outgoing mail server does not have to be the same as the incoming mail server.
We have already set up a server on smtp.brandx.net so we are going to add another one.
Now, where it says "Outgoing Mail Server" select "Edit Smtp Server List" from the dropdown.
We already see "smtp.brandx.net" is there. Hit "+" to add another server.
Your screen will look something like the image below, however, you will need to make some changes.
Double click the "Description" for the new server and set it to mail.brandx.net.
Double click the "Server Name" for the new server. This should also be set to mail.brandx.net.
Down below, unclick the "Automatic" settings and then set as follows:
Port = 10025
Use SSL = unchecked
Authentication = Password
Allow insecure authentication = checked
My username is "jimp" but yours will almost certainly be something else. If you are not sure contact us and ask..

The settings for "smtp.brandx.net" and "mail.brandx.net" are pretty much the same, but the username and password may be different.
Now click "ok" to go back to the previous page.
Now, and this is important, where it says "Outgoing mail server" click the dropdown and change it to "mail.brandx.net".

Everything should be good.
Send yourself a test email to make sure.
If there are problems, make sure all the click boxes are set correctly, and double check that you are using the outgoing mailbox you think you are, and also, check to make sure that the username and password are correct. They may or may not be the same as the username and password you use to check email.