


TP LINK 300 M
These instructions will explain how to set up the TP-Link 300M wifi router.
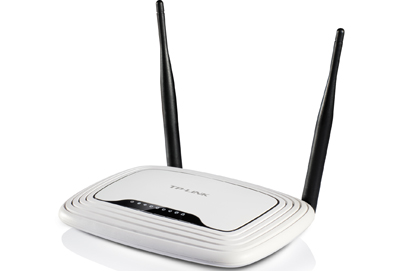
The TP-LInk unit is a popular and reliable router. On Amazon it is one of the highest rated brands. It has four ethernet ports in the back and also supports WiFi. It is compatible with Mac, Windows, and most mobile devices. It is configured via an internal web page form.
This router requires a separate DSL modem if you are setting up DSL.
Most other models of TP Link use essentially the same software. So even if your device looks a little different, the instructions should work. The more recent versions of the software have a blue background rather than green, but are essentially the same.
Modem Lights
If you are setting up a DSL line, check the modem before you do anything else. For those setting up an ethernet or fiber connection, you can skip this step and proceed down to the "Router Lights" section.
For DSL (only), check the lights on your modem and make sure you have a good dsl signal. There is no point in spending a lot of time setting up and troubleshooting a router if you don't have any DSL signal.
On Westell modems, the "Ready" light should be solid green. No light, or a blinking light, means no DSL signal.
On Netgear modems., the "DSL" light should be solid green. No light, or a blinking light, means no DSL signal. The light doesn't have a name but it looks like this: ![]()
If you are not sure how to check the lights, refer to the instructions on our website for your modem.
If you do not have good lights on your modem, then setting up the router isn't going to work. You need to have a good DSL signal on the modem or you cannot set up the DSL. If you can't get a good signal, check your telephone cable, see if there are other telephone jacks to try, and be patient. It may take up to five minutes for your modem to sync up. Be patient.
If you really can't get a DSL signal, it may be that the telephone company has set things up incorrectly. In Verizon areas, the phone company often requires us to wire up the jack for them. If you need this, call us at 310 395 5500 and we will get it going.
Router Lights
The router lights will tell you what is connected, and if your DSL connection is working.
The router may be able to connect with the default settings. If so, great. That means we will only need to set up the wifi.
At the minimum we need to see that there is an ethernet light. If there isn't, fix that before you try to configure the router.
| Light | Name | Purpose |
| Power | The modem is turned on. | |
| Ethernet | There are four of these lights, one for each of the ethernet ports in the back of the router. If you see a light, something is connected. | |
| Wifi | If this light is on, it means WiFi service is on. Note that this does not mean your network is online, just that WiFi is turned on. | |
| Internet | If this light is on (green) it means your router is online. Blinking is ok. |
Ethernet Cables for the Router
Connect an ethernet cable from your modem out to the TP-Link in. The "in" port on the TP-Link is usually blue and there will be only one. Ethernet cables look like fat telephone cables with 8 wires inside instead of 4.
Connect a second ethernet cable from your computer to one of the four yellow ethernet "out" ports on the TP-Link. Look at the lights on the front of the TB-Link to make sure that it is recognizing and making a good connection to both your modem and your computer.
Connect to the Router
Our next task is to connect to the router so we can view the web page inside.
The easiest way to do this is to turn wifi off and then reboot your computer. This will work on either Mac or Windows. When the computer comes back from the restart it will have recognized and connected to the router. This takes a moment but it is very easy.
Once you have restarted the computer, you can skip to the next step.
Alternately you can manually connect if you don't want to restart your computer.
On Windows, open up a Dos session. From the start button, select search, enter cmd, and start the command (Dos) window.
Now type "ipconfig /renew" at the dos prompt.
The computer will hesitate a moment and then come back with configuration. Look for the section on ethernet and make sure of the ip address of the router (which is the ipv4 address of the gateway. It should be something like 192.168.0.1.
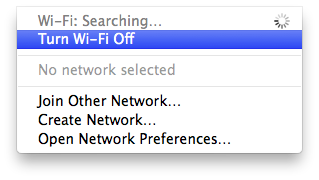
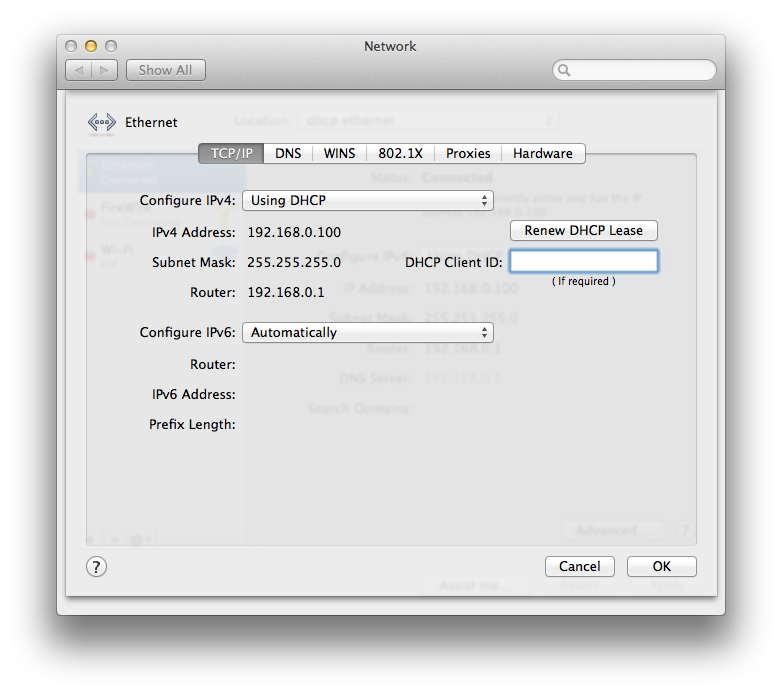
On Mac, turn off your wife and then from the wifi menu (upper right on your screen) select "Open Network Preferences".
That will bring up the Network Preferences box.
Notice that Ethernet is on (Green) and Wi-Fi is off (Red). That's how we want it. If you have something else you have have difficulty getting things to work.
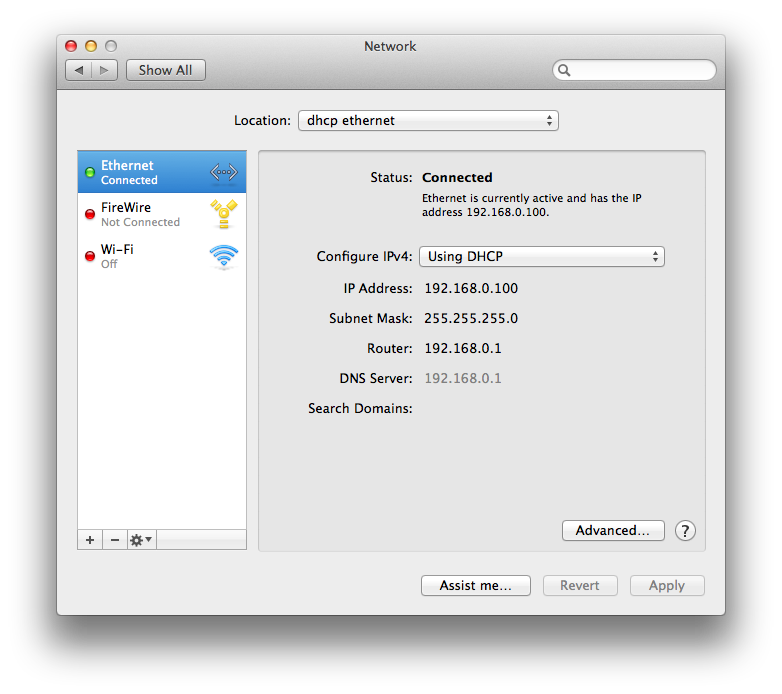
If you don't see an IP address similar to the one shown here, click on "Advanced" and you will see something like the picture below. Click "Renew DHCP Lease) and you should get a valid IPv4 address that is similar to the one below.
Make a note of the router address, we will need that later.
You are now connected to the router.
Login to the Router
If you got this far, then you should be connected to the router either with Mac or Windows
From here on out the instructions are the same whether you have Mac or Windows.
Open Web Browser
We are going to use a web browser to open up the web page in the router and fill in the web form to configure it.
I'm going to use Safari on a Mac but it's the same if you use Explorer or Firefox or Chome.
Put in the address 192.168.0.1 (or whatever ip address you have for the ip address from the previous step). Sometimes it's 192.168.1.1.
You should see a window asking for a username and password for access that will look something like the image below. The default login is:
User: admin
Password: admin
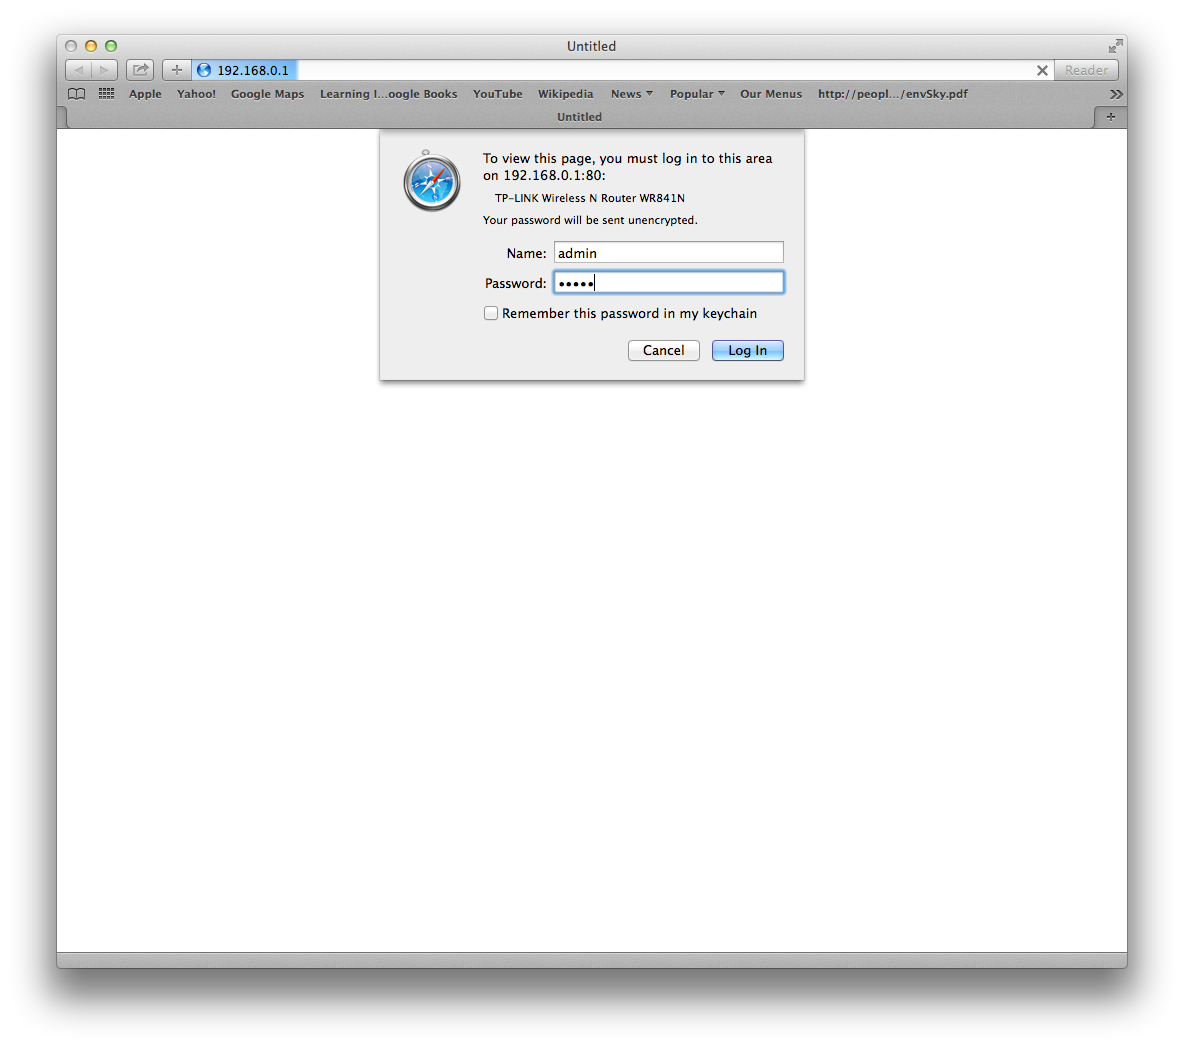
If admin/admin doesn't work, try password = "password".
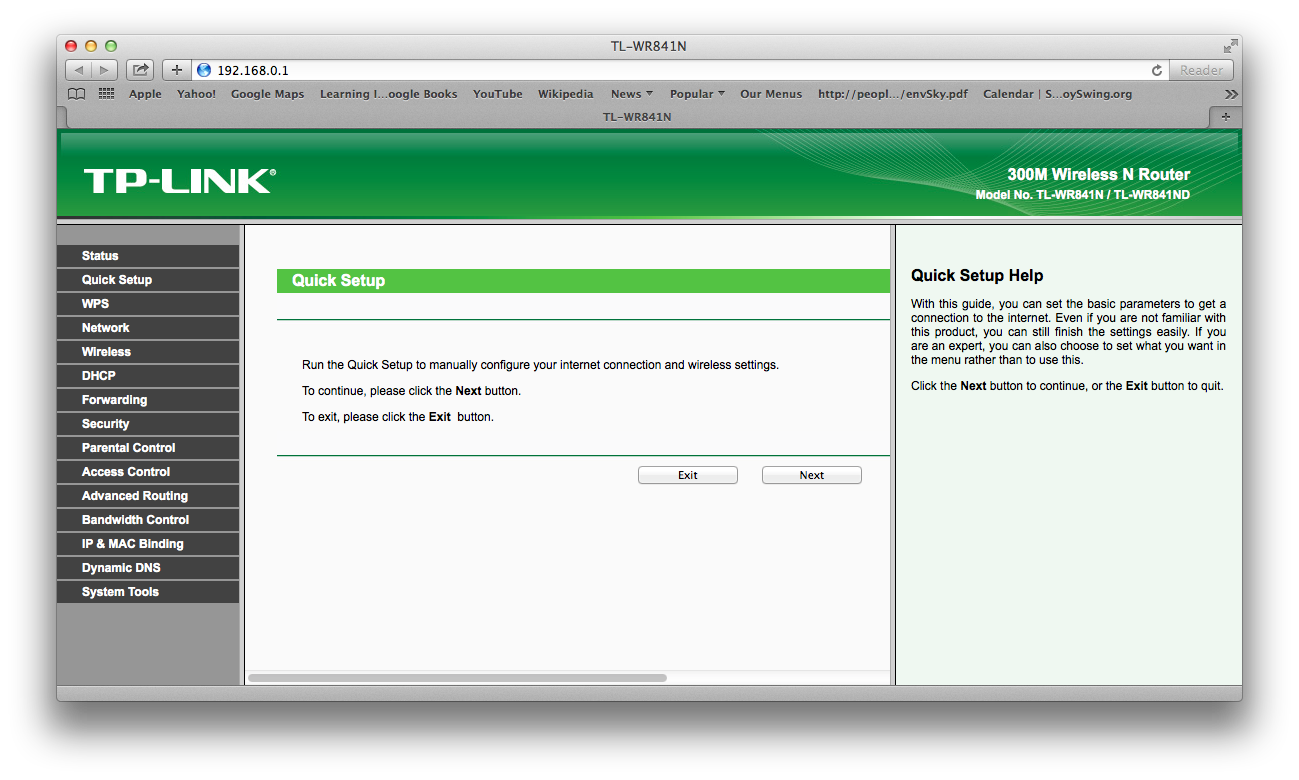
If you are successful with the username and password you will see an invitation to use the wizard to set up the router.
If this is the first time configuring the router, you can use the "wizard" to answer questions and set up the router.
The questions will parallel the setup instructions below. The wizard just walks you through the questions in order.
You can do this if you like, but I'm going to show how to set it up with the manual settings from the menu on the left. You may need to know this anyway because you might have to come back and change some settings and wizards aren't very good for that. So I am going to ignore the "Quick Setup"
Wizard Setup
The wizard will confirm that you are setting up a router, then walk you through the configuration step by step.
For most of the questions you can use the default values.
First it will ask about the upstream connection.
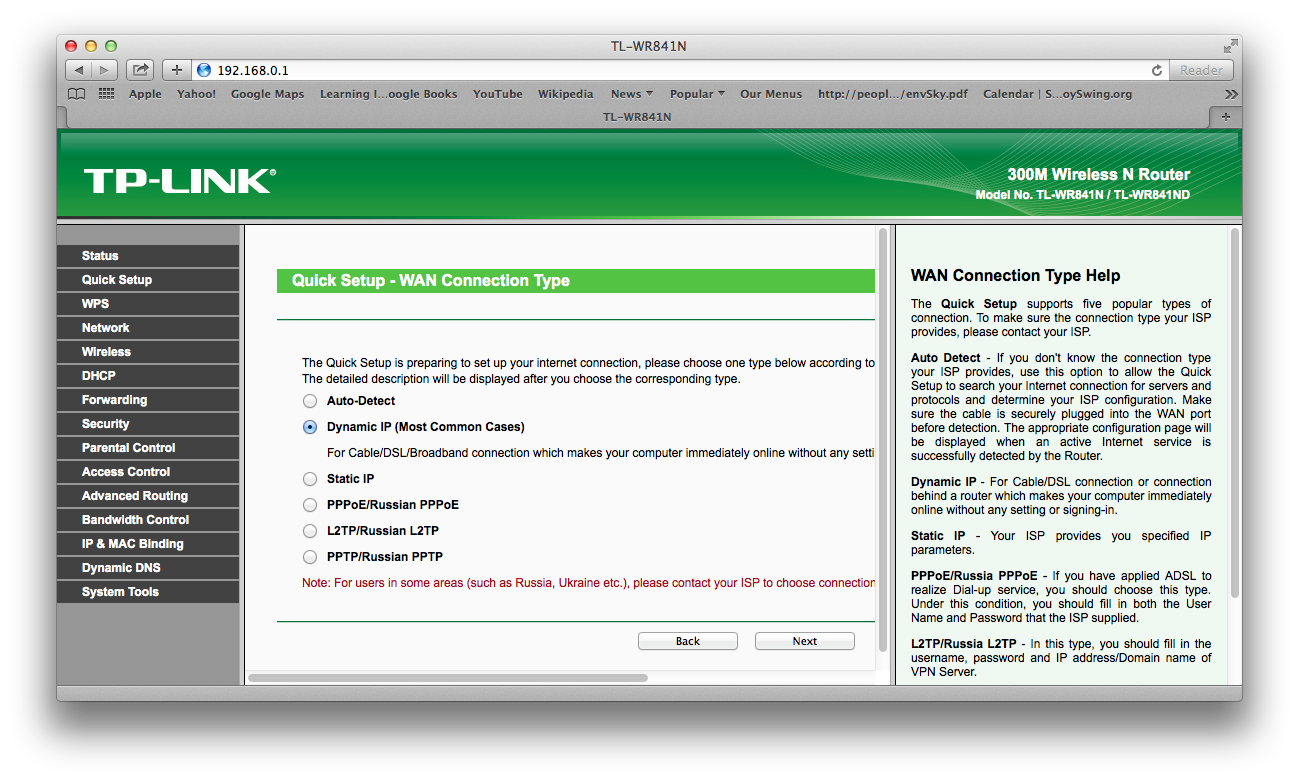
The connection type will be either dynamic (dhcp) or pppoe. Fiber connections are always dhcp. If you are not sure, try dhcp. Never tell the router to try to figure out what kind of connection you have. It often gets it wrong. You should select the connection type yourself. If unsure, try dhcp ("dynamic").
If the connection is PPPOE then you should have a username that is something like 3105551212@brandx.net or 3105551212@value.net. There will also be a password. You will need to enter these to get connected. This only applies to DSL customers. If not sure, try dhcp.
That's all there is to setting up the connection.
Next we set up the wifi.
Most of the default values are ok.
You will need to choose a network name ("ssid"). The default is usually something with the device manufacturer in it. We usually change it to "Brand X Internet". You can set it to anything you like.
If you have a "dual mode" or "5g" router, you will need to choose two network names. For example, we usually set up "Brand X Internet" and "Brand X Internet 5g".
You will also need to choose a password. You can make it anything you like. The minimum length is 8 letters.
If you have the 5g flavor you will need to choose a password for 5g also. We usually make it the same as the regular password.
That's it, we're done. Save your work, restart the router, and see if you can get online.
If for any reason this doesn't work, just set everything to the default values and then proceed to manual setup below.
Manual Setup
Here's the first step of the TP-Link Quick Setup
Configure Connection
The first thing we want to do is to set up your dsl connection. Your connection type is usually either DHCP or PPPOE.
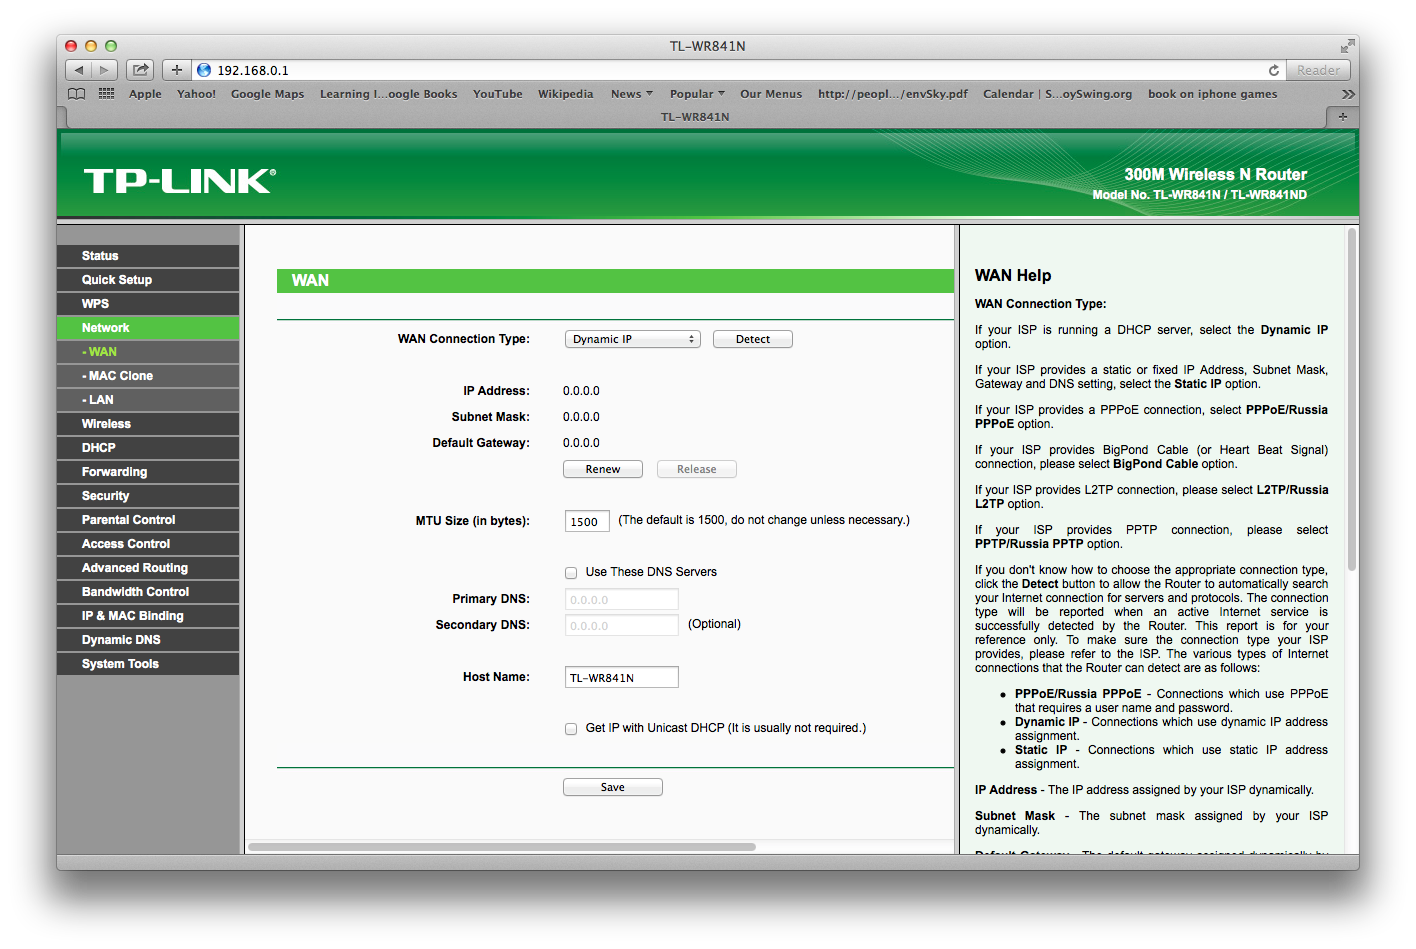
DHCP
Select "Wan" and then select "Dynamic IP". This is about the same as setting the connection type in the wizard, two ways of doing the same thing.
Save your settings. That's all there is to setting up DHCP (though you will still want to set up WIFI, which is described later in this document.

In the image below DHCP is turned on and is attempting to get an address. When it is w
PPPOE
DSL customers who have PPPOE connections need to answer a couple of additional questions.
Select "Wan" and then select "PPPOE". This is about the same as setting the connection type in the wizard, two ways of doing the same thing. You will need to enter a username and password to make the PPPOE work, as shown below:
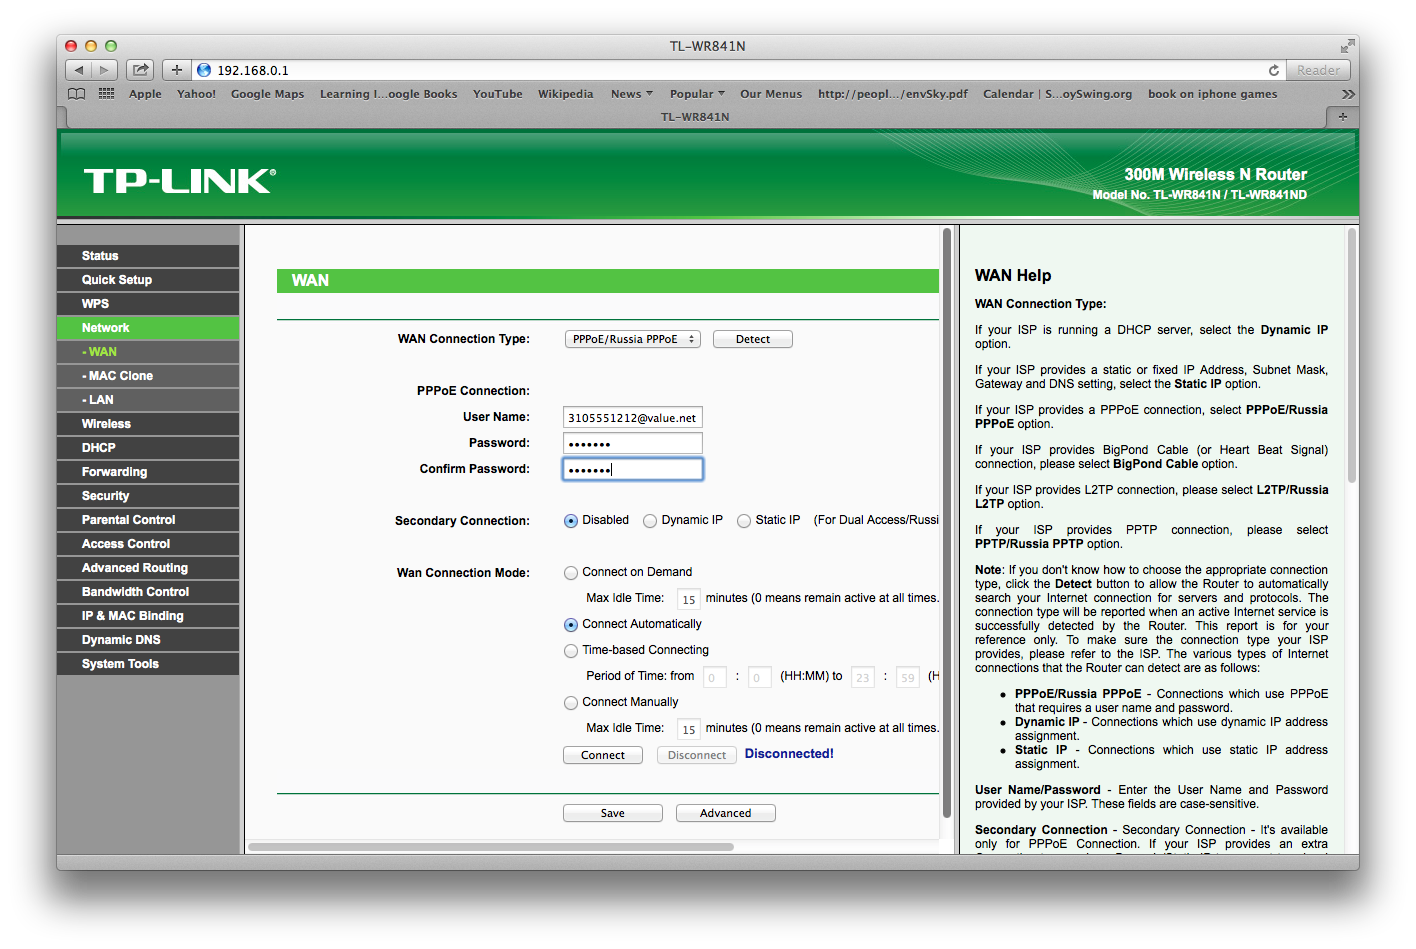
Save the new settings you just put in. This is all you need to do to set up the DSL, though we will still want to set up WIFI.
Wireless Setup
Wireless setup is super easy. First click on Wireless - Wireless Settings in the menu on left, and enter the WIreless Network Name you desire, as shown below.
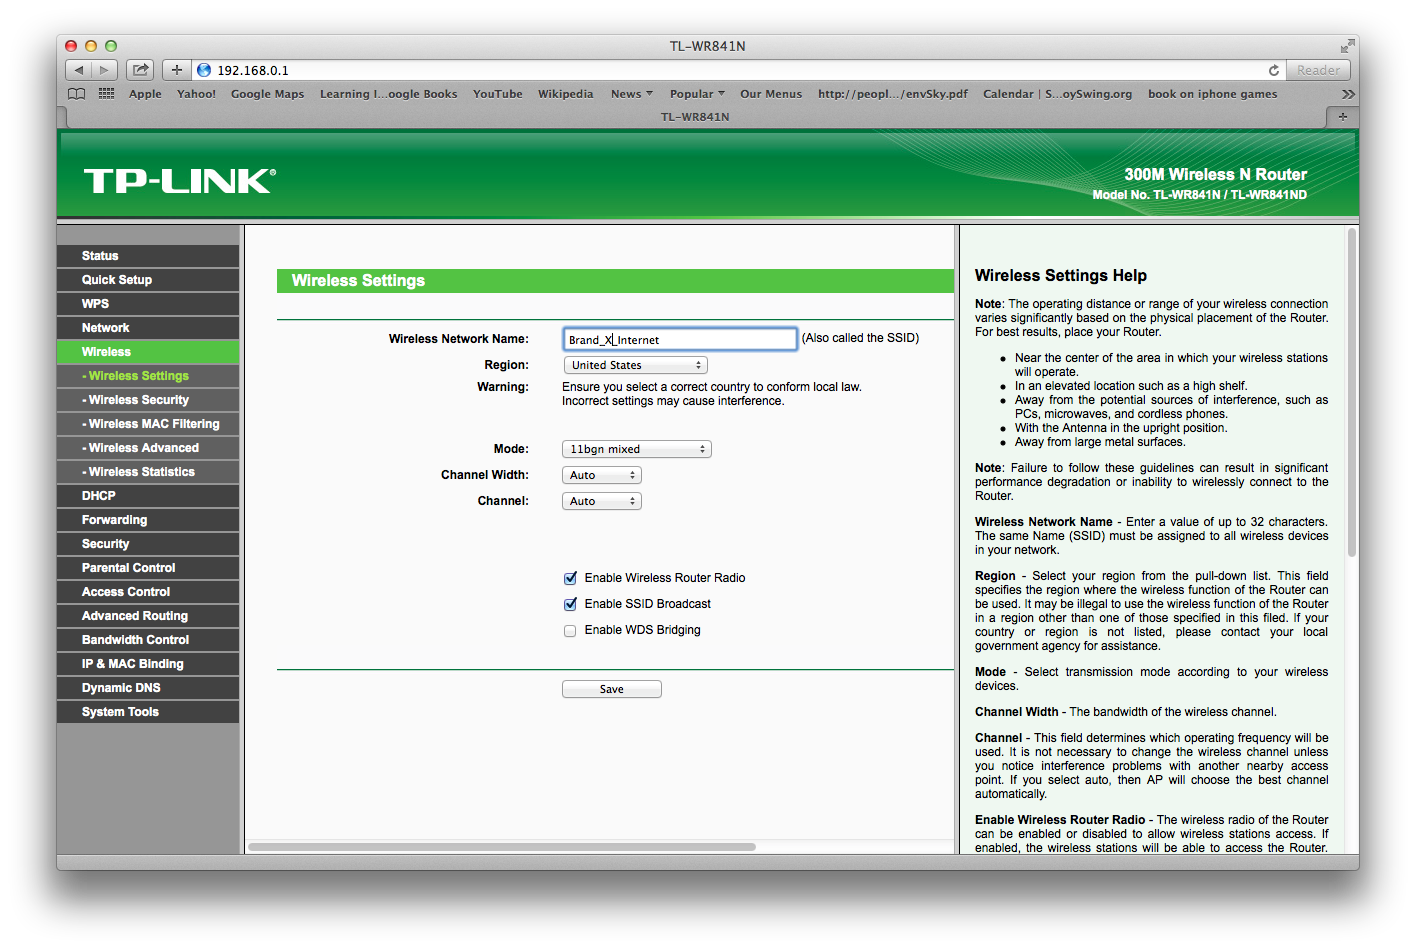
You can leave the other settings at defaults.
Now select "Wireless - Security" and enter a password for your network as shown below. You don't need to worry about any of the other settings. Save your settings and Wifi should be ready to go.
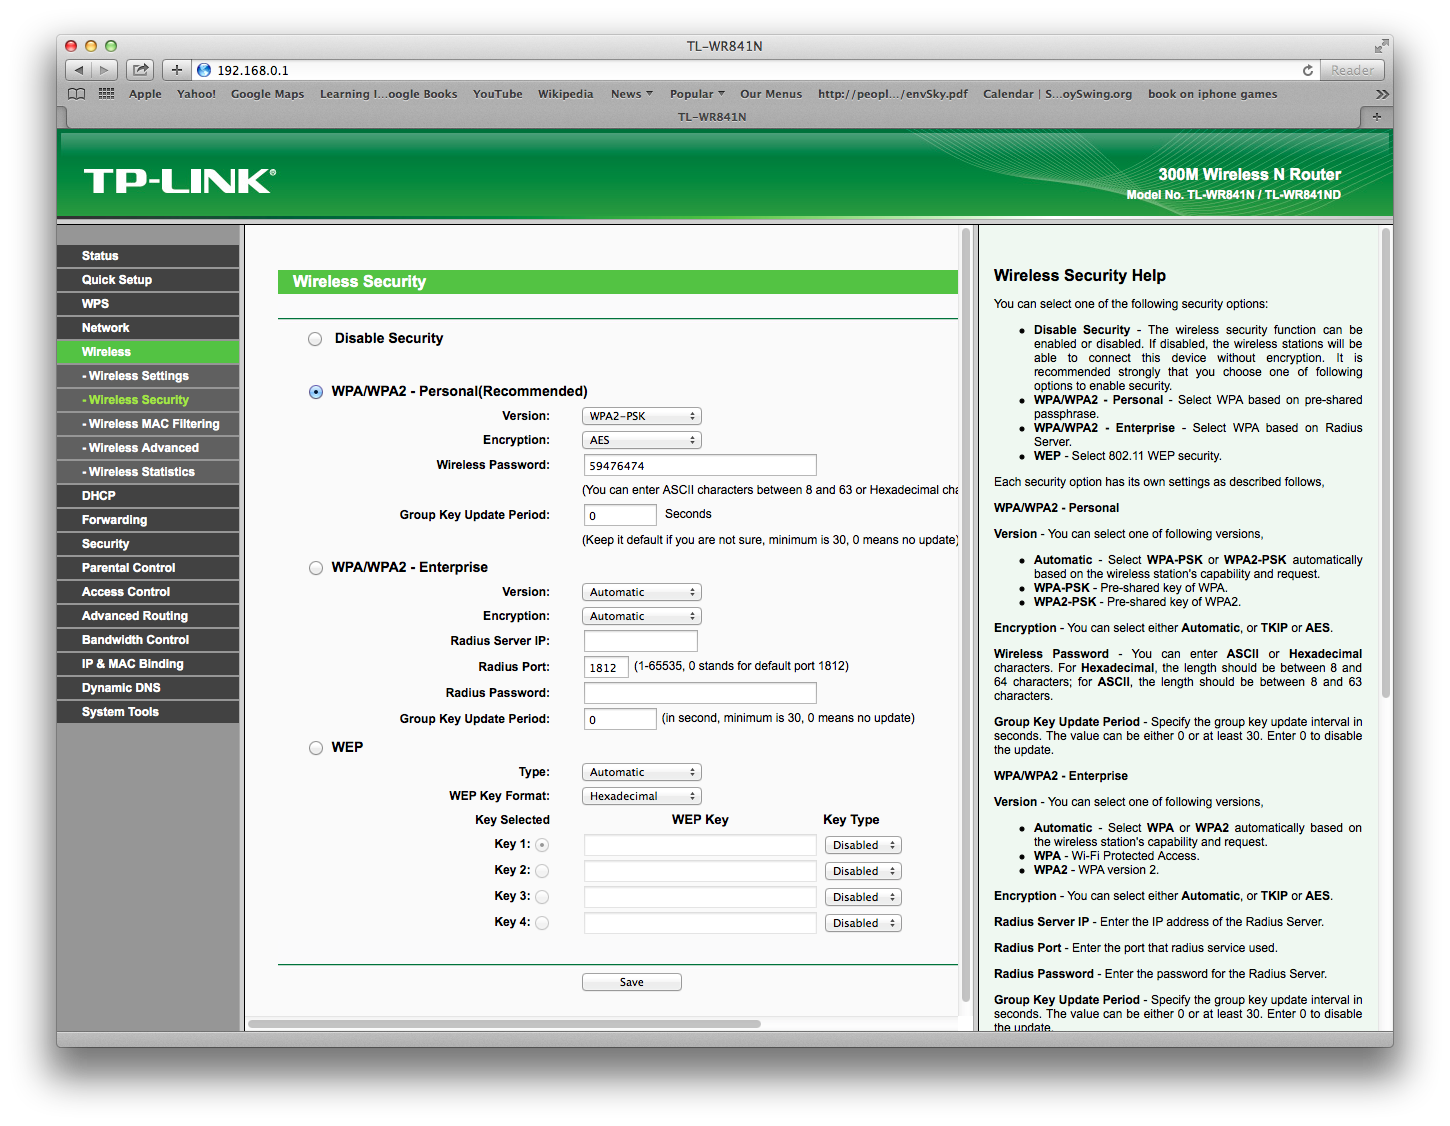
Save what you have done and you should be able to log in via WIFI.
Note: if you turned off wifi in order to configure the router, you can turn it back on now.
Checking Status
If you want to see what your DSL connection is doing, have a look at "Status" in the menu on left.
The connection in the image below is set for DHCP but is not currently connected. We know this because WAN does not have a valid IP address.
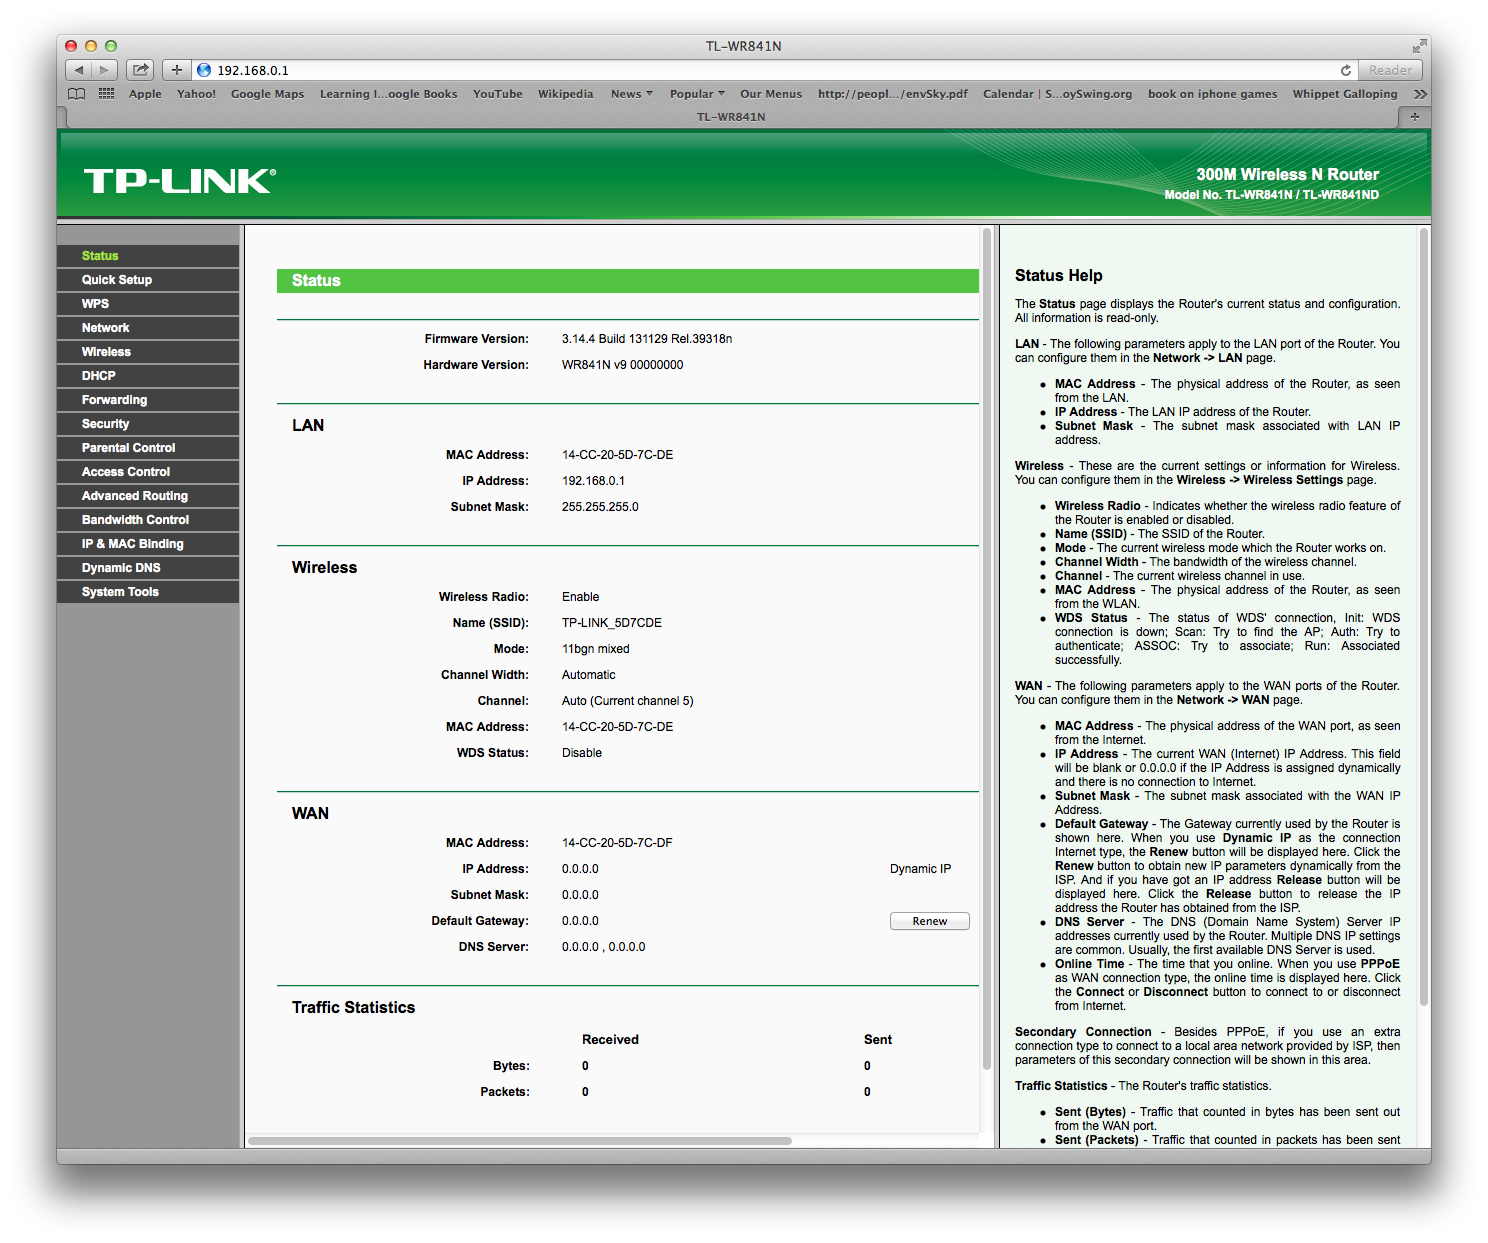
If the connnection is up, you should see a valid "Ip Address" instead of the 0.0.0.0 shown above.
A valid ip address starts with any number between 1-254, except 169. If the address starts with 169, that means there was an error or no response.
Happy surfing!
