Actiontec GT704-WGB Router Setup
Actiontec GT704 devices combine a modem, a switch, and a wireless router all in one small box. Old ones are boxy, new ones are rounded on the edges, but setup is similar.
These instructions will help you convert your Verizon modem to use on the Brand X network. There are a number of similar models so yours may or may not look like the picture above.
Most of the information in this page comes from the Actiontec GT704-WGB Router Manual which you can view online.
General Setup Strategy
If you are a former Verizon customer, you were probably set up with a PPPOE connection, which is a form of automatic setup with a username and a password.
- If you had PPPOE on Verizon and have DHCP on the Brand X network, you will need to remove PPPOE from your setup and switch it to dhcp. You will then come online right away. Most Brand X connections are setup with DHCP but we do have both.
- If you had PPPOE on Verizon, and have PPPOE on Brand X, then you will need to change the username and password for your account.You should then come online.
- If you are setup with a Static Address on the Brand X network, you will need to remove PPPOE from your setup and switch it to static.
Instructions for all of these follow.
Let's get started.
Connect the router
The router should have a telephone line to the wall and an ethernet cable to the computer you will use for configuration. Configuration should be done by cable, not via wireless.
The following diagram shows how to connect an actiontec router. The model shown is a slightly different model.
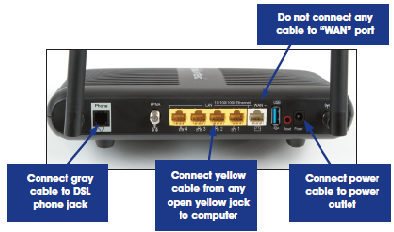
Note that the "Wan" port should be left empty. That's because the Wan port is an alternate to the dsl. You can have DSL as your input for network traffic, or you can use the WAN port as an input, but not both. You would use the Wan port if you are using the Actiontec as a router only with a separate dsl modem. So, for now, leave the Wan port empty.
Check Modem Lights
Before you start setting up DSL, make sure that the modem is making a good connection by making sure that the DSL light is solid.
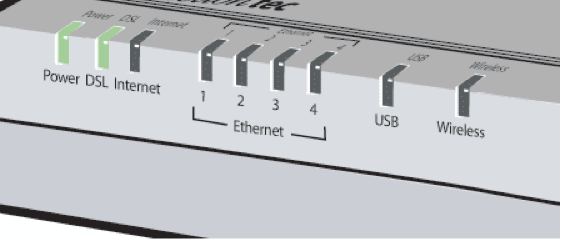
Refer to the following diagram to see what the various lights on the Actiontec router mean.
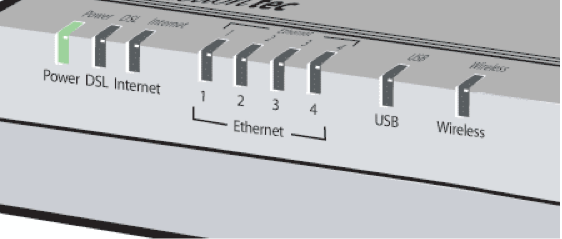
The router in the picture is NOT connected to the internet. The dsl and internet lights are both off. There are also no devices connected to the ethernet ports. This is what the lights look like if you plug in a modem but it isn't connected to anything else.
Here's what the lights mean:
Power: this indicates that the router is getting power.
DSL: If this light is green, the router is getting a DSL signal. If you dont see this then your DSL signal is not getting to the router. If the line hasn't been turned on yet, or if there is a loose or mis-connected cable you will see this problem.
Internet: If this light is solid green, then the modem is connected. This means not only could the modem see a signal, but it was also able to connect to the internet. Sometimes this means the router needs to reconnect. The easiest way to do this is to turn it off and on. It takes a couple of minutes to sync up the connection so be patient. If you have a PPPOE connection this might mean your username and password are not right. Customers with DHCP connections have no username and password.
Ethernet: A light should come on for each device connected, if the connection is good and if the device is turned on.
Verify Sync
We need to make sure we have a DSL signal before we try to set anything up.
If you connect the Actiontec router to a live dsl line, at the very minimum you should get the "DSL" light on solid. That looks like this:
If the line is set up correctly and is connecting and getting online, your lights might look something like this:
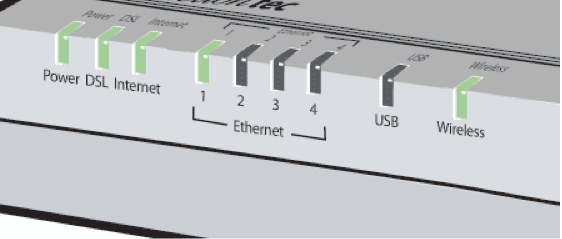
In this image
- Power is on
- DSL on shows we have a DSL signal
- Internet on shows we are online
- 1 means we have a computer attached to ethernet port 1
- Wireless on means that we are broadcasting a wireless signal
Your lights may be slightly different depending on what you have attached, however, a working dsl will always have the first three lights on and solid (not blinking).
Connecting to the Router
Note: you have to have good lights on your modem before you start configuring. If you don't have a DSL signal there is no point in trying to configure your connection. Check cables, turn everything off and on, or if nothing else give us a call at 310 395 5500 and ask someone to check the line.
Like most other routers, the Actiontec router has a web page inside that you can use to do configuration. Connect a computer to the router with an ethernet cable (not by wireless) for configuration, and restart the computer to make sure that the computer is connected.
Now open a web browser such as Firefox or Exporer and put http:192.168.1.1 in the address bar. Depending on what browser you are using, that looks something like this:

You will neeed a username and password to connect to the router.
The default user name for the Actiontec MI424WR router is "admin," and the default password is "password". You can change these but we do not recommend it because it will lead to problems if you forget the password.
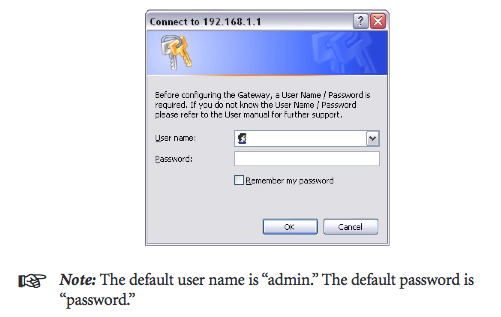
If you login successfully the router may put you into quick setup, which is shown further down below.
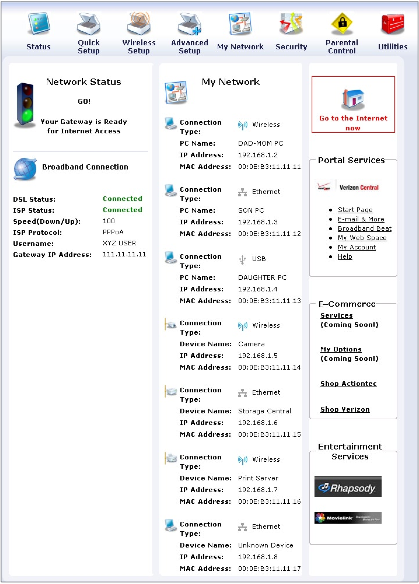
Or, it may show you the "home" screen which might look something like this:

Or if you have an older version, it might look like this:
Factory Defaults
If you logged in successfully, please skip this step.
If you can't log in, someone probably changed the password to access the router. Look on the router and see if someone left a note with a password. If so, great. If not, we can fix it.
To reset the password to the factory default (admin/password) you just reset the whole unit to factory default settings.
Get a paperclip or something thin and strong and insert it in the red hole marked "reset" on the back of the router. Press and count off thirty second while holding this button down. The lights on the router should flash a couple of times and it will reset.
Now turn it off, ten seconds, and back on again.
Your router is now reset. Go back and try to log in again. This time the factory passwords should work..
New Password
We think changing the password for access to the router is a bad idea, but some versions of the router will require this. If so, we recommend the password "password1". Please be sure to put a note about this on the side of the router so you will have an easy time accessing it next time.
Quick Setup
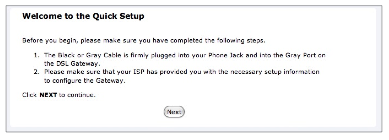
In most situations Quick Setup (found on the home screen) should be sufficient to get you going.
Here's the first screen.
Click "Next".
Here we need to choose DHCP or PPPOE for your connection type. If you are not sure which connection type you have, try DHCP. If that doesn't work, check with Brand X Internet.
If your connection is DHCP this is all you really need to do. Skip through the rest of the questions, don't fill in any other blanks, no username and password or dns settings, and when you get to the end, click "apply" to save your configuration changes. The router will take a minute or two to restart and when it fnishes you should be online.
If you selected PPPOE you will have been given a username and password by Brand X Internet
The username is usually the telephone number (or dummy telephone number) of your DSL line with "@value.net" appended.The password will be about 8 letters in a row such as fghjkh. Both the username and password are case sensitive. You will not be able to guess the password so if you are not sure call us at Brand X Internet at 310 395 5500 to get the username and password.
On the next screen select dynamic, unless you have been given a static ip address.
Here's where you save your changes.
The router will take one or two minutes to fully restart.

When the router comes back up, you should be online. Refer to the diagram showing the modem lights at the top of this page to check the status of the connection.
Advanced Setup
Normally the quick setup should be enough to get you going.
More information may be found on the Actiontec GT704-WGB Router Manual which you can view online.
Some customers prefer to set up the Actiontec device as a "dumb" modem in bridging mode, and use their own router. This can be a good way to set things up but is beyond the scope of this document.
Wifi Setup
Changing your upstream connection should not change how your wifi works. If your devices (computer, ipad etc) are able to connect you should not change anything. If you previously used your Actiontec router with another service such as Verizon then the wifi login information will not change and you don't need to change anything on your computer(s).
In a pinch: The default SSID key and passphrase are printed on the back of your Actiontec router. These will be different on each router.
How to Remove the Verizon Activation Page
Some Westell and ActionTec modems that are being shipped to customers now have a factory setting ENABLED by default known as Walled Garden.
Walled Garden causes a no route situation (unable to connect to the internet or surf) within the modem in order to force registration via the Web Based Activation site. In order for you to route (or connect to the internet or surf) with these modems, Walled Garden must be turned off or disabled. You will need to go to a url in the router, log in, and instruct the router to disable this "feature".
For the Westell 327 and 6100 Modems use »192.168.1.1/verizon/redirect.htm
For the Actiontec Gateway use »192.168.1.1/verizon/redirect
For Westell 6100F, Westell 6100, Westell Versalink 327W, and Westell 7500, simply visit »192.168.1.1/verizon/redirect.htm and enter the modem’s username and password (default modem user name and password is “admin” and “password”). Click DISABLE and personalize your modem’s user settings. It is advisable that you change the password to “admin”. Turn OFF your modem for 30 seconds. You should be able to route (connect to internet) after walled Garden is OFF. Fow Actiontec Gateway, just visit »192.168.1.1/verizon/redirect and follow the above procedure clicking OFF button.
Contacting Brand X Internet
If you can't figure things out, or can't get green lights on the modem, contact us and we will try to help.
Often the fastest way to reach Brand X support is via Email at support@brandx.net
Our telephone number is 310 395 5500. We will do our best to help.


