


ActionTec 5000k (Qwest)
These are refurbished waranteed units obtained from Qwest. They combine good performance with a very moderate cost. Setup is easy.
Note that refurbished equipment purchased from Brand X includes full waranty for as long as you are a customer.
Most units if obtained from Brand X Internet will be preconfigured, but we are posting the instructions just in case.

Cables
Run an ethernet cable from the computer to the router as shown above. You can connect to any one of the four yellow ethernet ports.
The telephone cord goes to the input marked "Line" (not "Telephone").
Connect power supply and confirm that the unit powers on corrrectly.
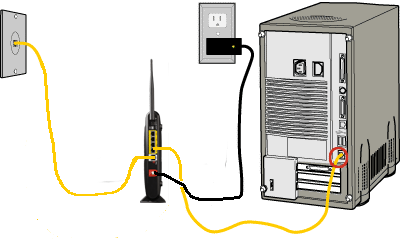
Below is a photo of the back of the device showing the cords attached correctly.

Note: Please connect your computer to the router with an ethernet cable. Please do not try to configure with wifi. Very often if you configure with wifi, security will block you, or you will find yourself configuring your neighbor's wifii router. Wifii introduces a host of problems we just don't want to deal with. If your computer does not have an ethernet port then please borrow one from someone else. It will save time and make the job much easier.
Lights
Below is a picture of the ActionTec unit.
Each light is labelled. From left to right they are Power, DSL, Internet, Ethernet (1,2,3,4) and wireless.
The one we are looking at is currently online, which is reflected in the lights we see.
If the DSL light is on we have a good dsl signal. If it is blinking or off, then no DSL signal, time to check cables or talk to the telephone company.
If the Internet light is on we have a good dsl signal and the router thinks it is online. If you have not configured yet then this probably will not be lit.
The ethernet lights show when we have devices physically wired to the router.
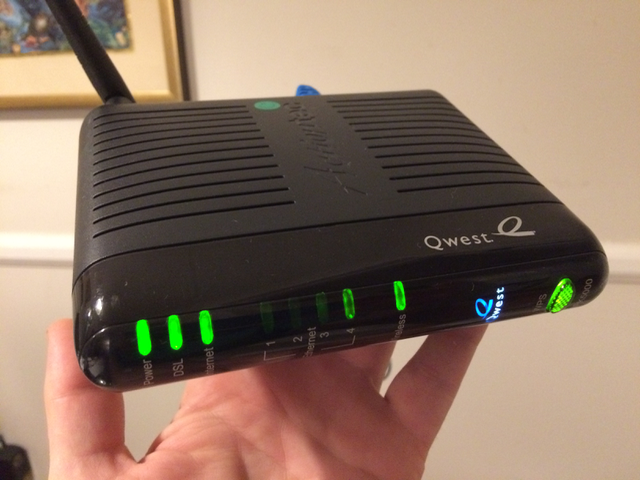
If you are setting up a new router, then the Power and DSL lights should be lit, but Internet probably won't be.
If you do not have "DSL" light then you do not have a DSL signal. This will totally stop you from doing any configuration because no matter how much you configure, if you have no DSL signal, it is not going to work.
If you don't have a DSL signal, double check that the installation date has passed. If it has, then check your telephone cord, see if there are any other jacks that you can try, and if that doesn't work, then contact us at Brand X Internet to see if we need to file a trouble ticket with the telephone company to get the line repaired.
Configuration
Before you do anything, please make sure that your router has a good DSL signal. See the note on this subject above. If you have no DSL signal this is like a phone with no dial tone. No matter how hard you try, it is not going to work.
Configuration is done on a web page that is in the router. So we will connect to the router and load this page, make some changes, and then save those changes. This is how nearly every brand of router works. If you have ever configured any other kind of router, this is going to look pretty similar.
Make sure your computer has wifi turned off. We don't want to connect to other devices via wifi. Your computer should be able to connect to this router and not to anything else.
Open your browser (Explorer, Firefox, Safari) to the numerical address 192.168.0.1 by typing these numbers in the address bar of your web browser.
The ActionTec web interface should come up.
Note that no internet connection is required. We are not going out to the internet. We are just going from computer to the router.
That should usually work, if not try 192.168.1.1 or 192.168.1.254.
With most units there is no access password but if the unit asks, try user="admin" and password = "admin" or "password".
For the unit we are looking at, no password was required.
Walled Garden
This router may have a Qwest installed "Walled Garden" feature that will prevent its use without validating your Qwest account. Until the Qwest account is activated, nothing will work.
Don't worry. We will circumvent this.
If you follow these instructions, when you put in the PPPOE information, the "walled garden" feature will be overridden. Warnings about the "walled garden" can be safely ignored.
Router Configuration
When you reach the router, the start screen will come up, similar to the image below.
We will make settings on about four different pages in the router. Each time we make a change we will need to save it. So we will have to save about four times, and each time it will take about 30 seconds. Total time for configuration may be as long as 5 minutes.
There are two setup instructions, one if your line is "DHCP" and one if your line is "PPPOE". Your line will be one or the other (but not both). We will have setup for DHCP first and then PPPOE.
DHCP Configuration
If your line has PPPOE setup you can skip down to that section.
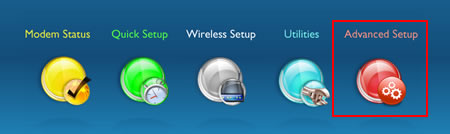
From the menu, select "Advanced Setup".
Select "Wan Settings".
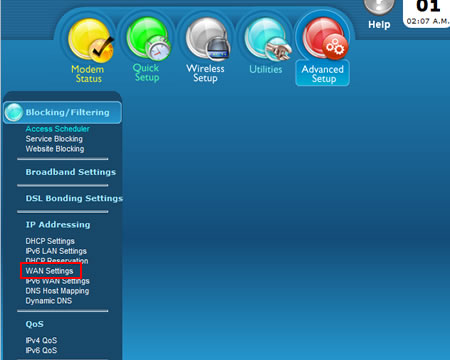
Select "IPOE". This is what Actiontec calls "DHCP", it's the same thing. Actiontec is the only one that uses this name. The rest of the world calls it DHCP.
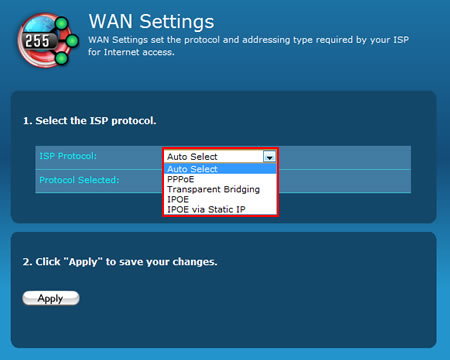
Click "Apply" to save your changes.
That's it. DHCP setup is really easy.
PPPOE Configuration
If your connection type is DHCP, skip this part, it's only for people with PPPOE setup.
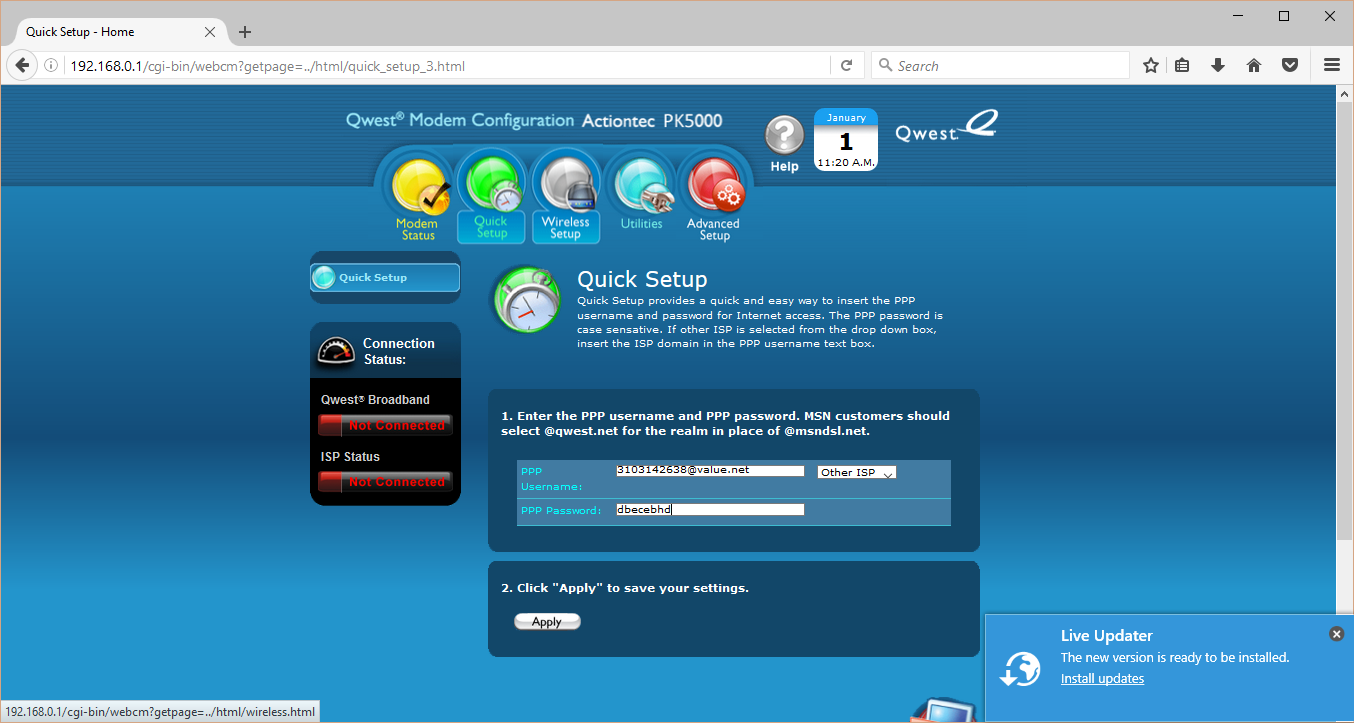
Select "Quick Setup". You should see something a little like the diagram below
Switch the "ISP" to "Other ISP" and set the PPPOE username and password to the ones that you were given by Brand X Internet. These will be different for every user. If you don't have them call us and ask, you won't be able to guess.
Be sure to save your changes here.
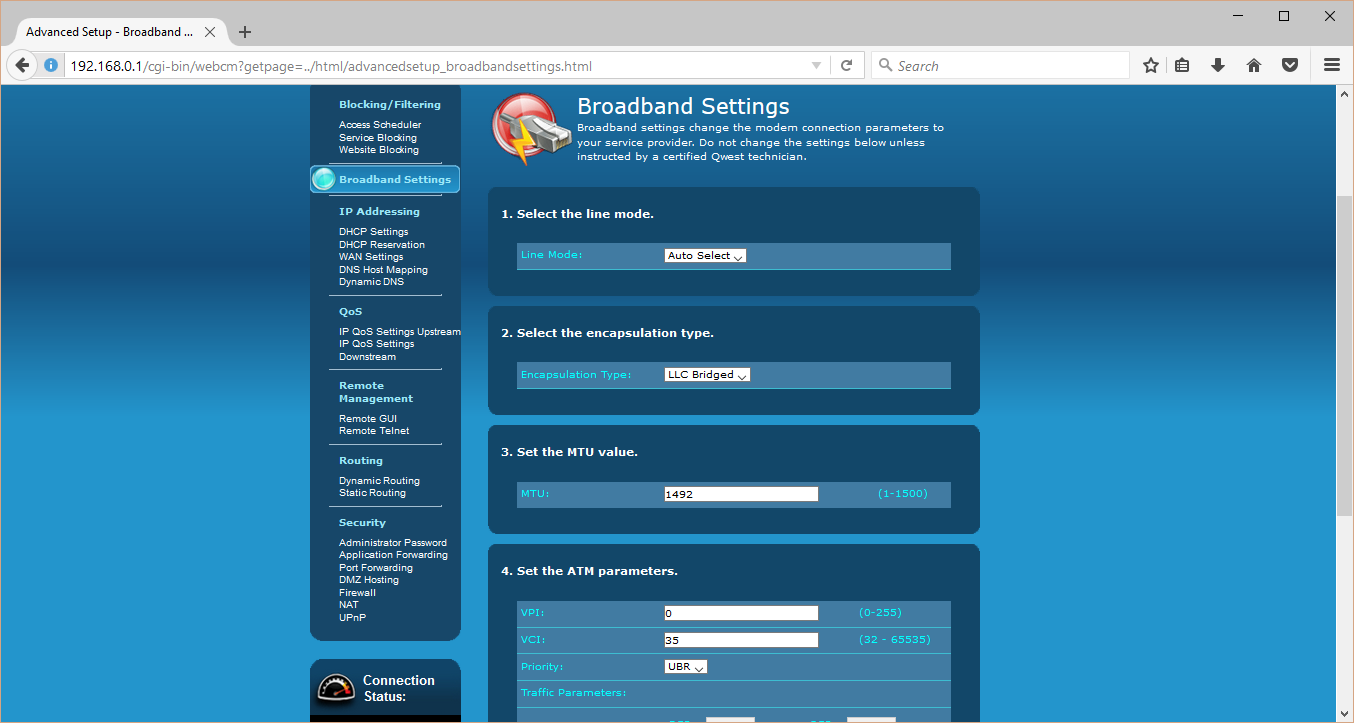
After setting the PPPOE information, we have to to to "Advanced" and "Broadband Settings".
Make sure the settings look exactly like they do in the diagram below. Make sure the VPI=0 and VCI = 35.
Be sure to save your changes.
OK we have set up the line and we have saved our changes.
Configure WiFi
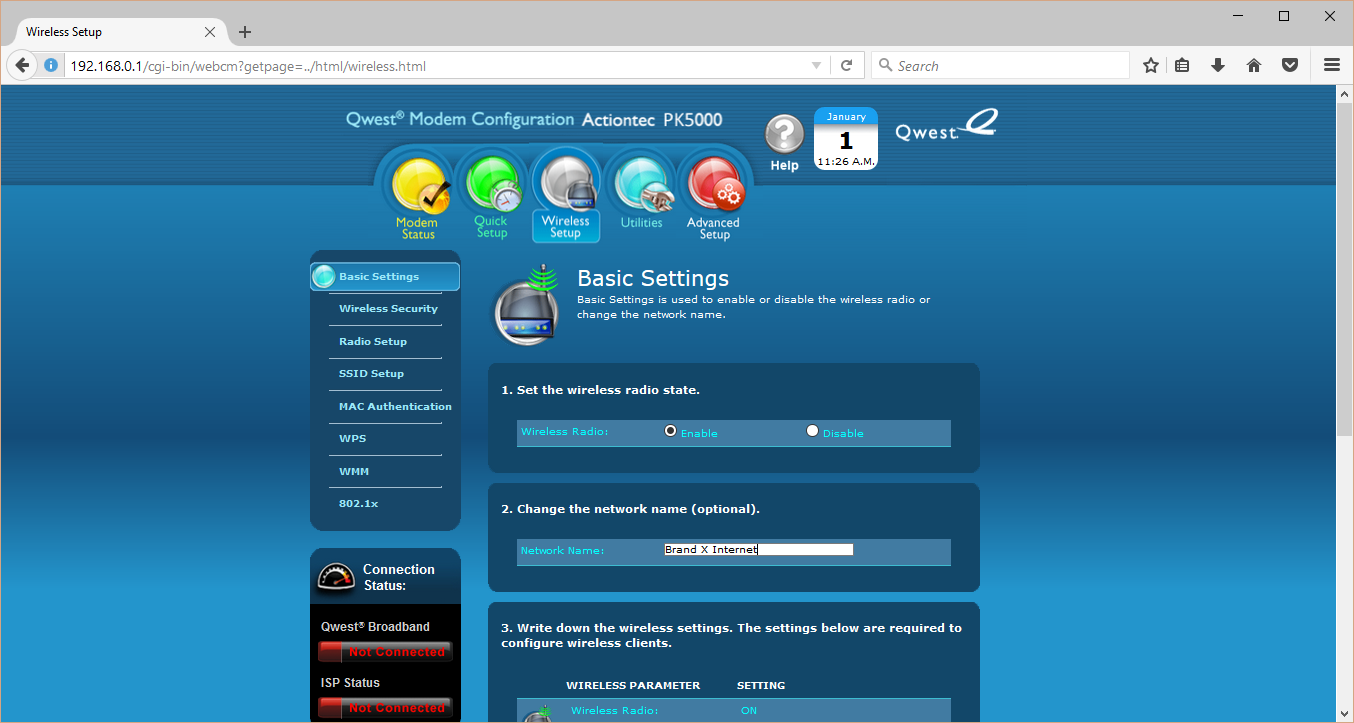
Select "Wireless Setup" and "Basic Settings".
Make sure the router has wifi turned on and set the Network Name (SSID) to something reasonable. We usually set it to "Brand X Internet". Note that some versions may object to the spaces in the name so you may have to type "BrandXInternet".
Save your changes.
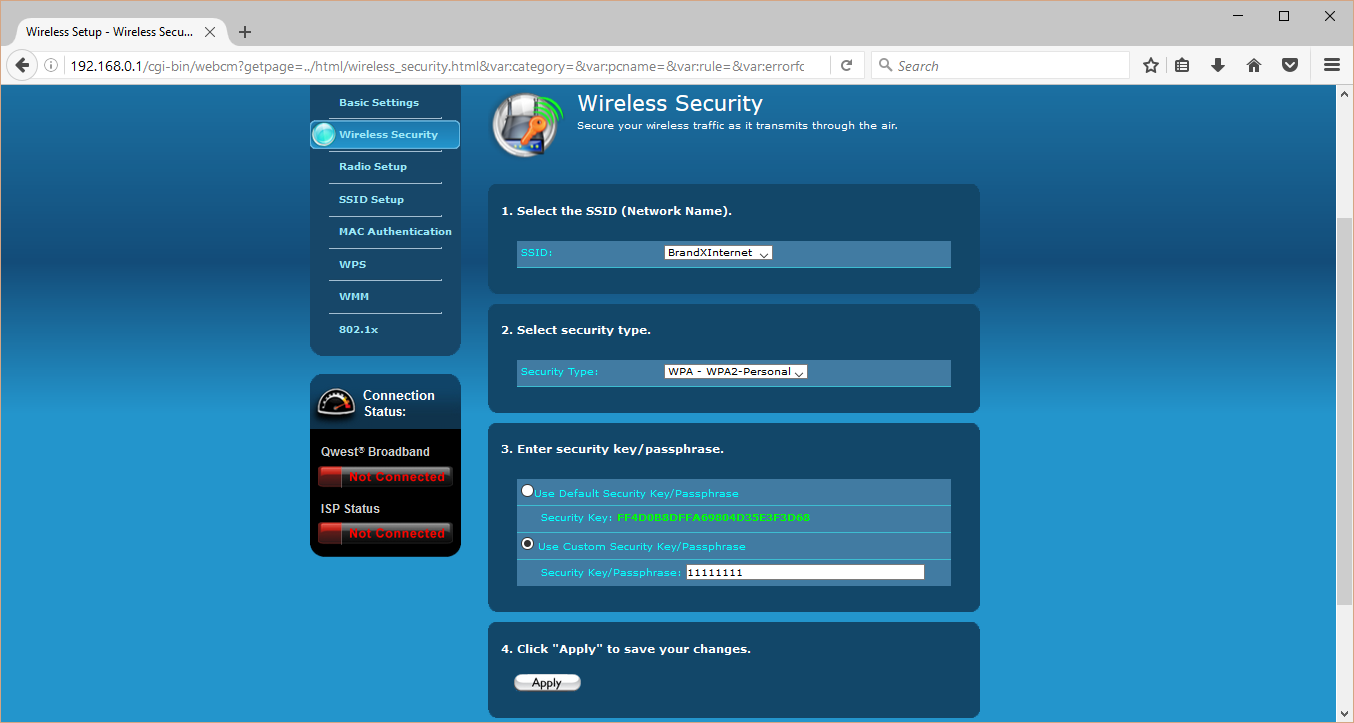
We have turned wifi on, but the system assigns some crazy password with about 20 random digits. We usually set it to something simpler.
A good password should be used for email and for things like bank acounts, but on your WiFi, a weak password is generally OK as long as you have good physical security in your home. Someone has to be very close by in order to steal access to your WiFi.
Select "Wireless Security" and set the password as shown below. If you choose a different password it usually has to be at least 8 characters long.
We sugest that you get a piece of tape and write the password on it and put this on your router.
When you have it right, save your changes.
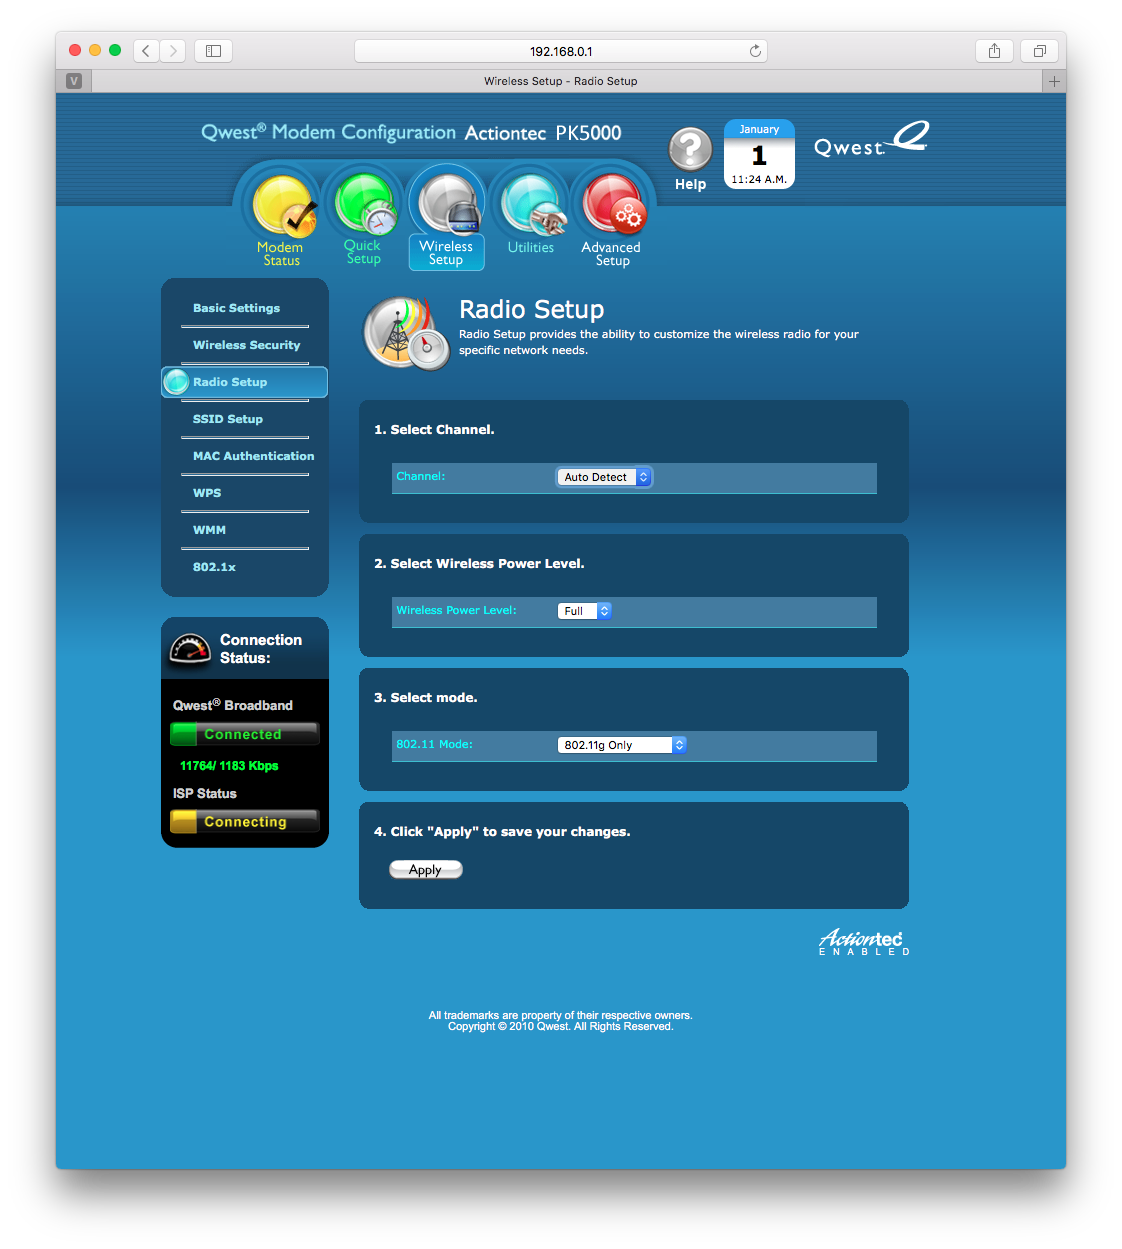
Set Radio Station
This is an optional step. If you find your WiFI is performing poorly, you can try changing the station. If you and all your neighbors are all using 11, which is a very common situation, you may find it works better on another station.
In the image below, the channel is set to "Auto" which will probably set it to 11. You can set it to something else. There is no rule here, you just have to try and see what works.
Configure DNS
This is an optional step for DHCP and PPPOE users.
By default these devices will use the phone company DNS.
The main place you will notice the DNS is that when you mistype an address, the phone company website will come up. I hate that.
We recomend instead that you use Google DNS.
The settings is in the same place where you set the connection type to DHCP or PPPOE.
Set the DNS to "Static" with the servers 8.8.8.8 and 8.8.4.4 as shown below.

Confirming Connection
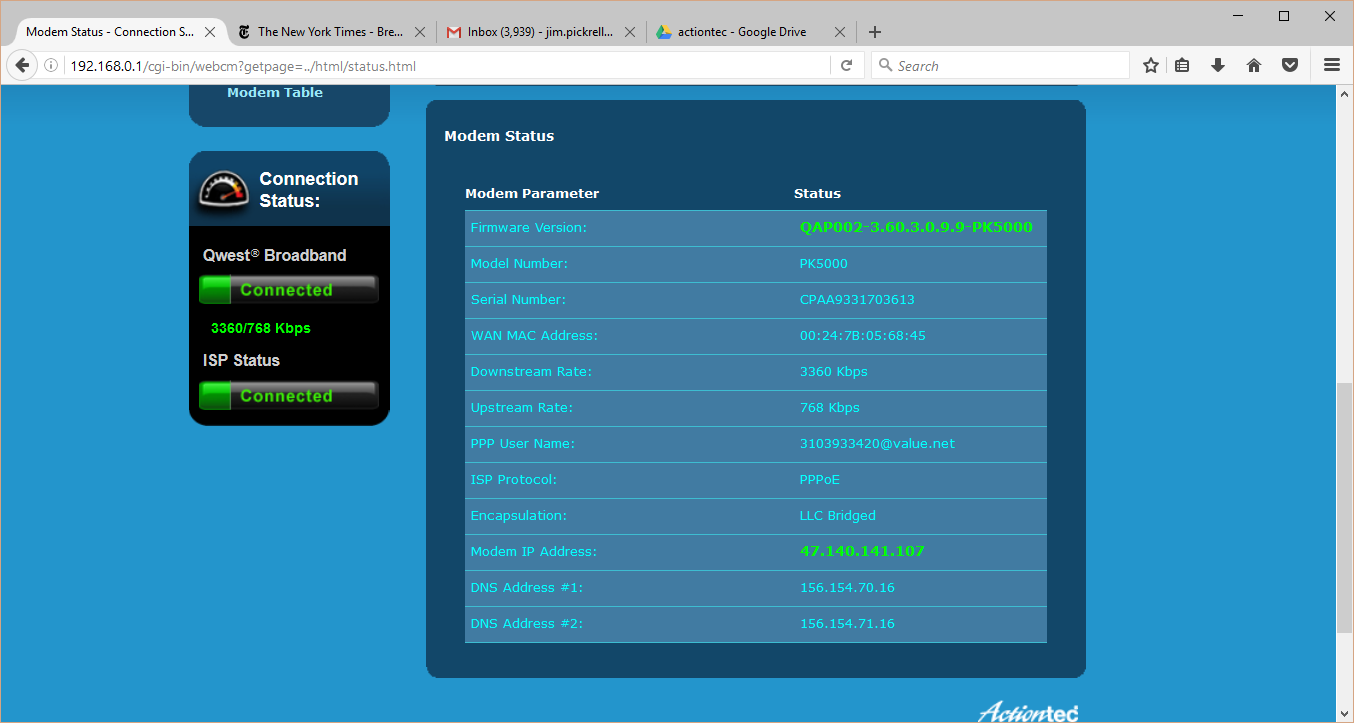
OK now we have set up the line and the wifi. Let's confirm that we are online
Go back to the "Status" page and it should look something like what we see below.
Confirm the following:
"Broadband" is "Connected". This means you have a good signal, but does not tell us if the password was right.
The speed should match what you signed up for. Usually it will be the same as what you see below, 3360/768 Kbps
ISP Status is "Connected". This means the username and password for pppoe were accepted.
Confirming Status Lights
We should also double check that all the lights look good.
If the DSL light is on solid green, we have a good dsl signal. If it is blinking or off, then no DSL signal, time to check cables or talk to the telephone company.
If the Internet light is on solid greenwe have a good dsl signal and the router thinks it is online. If not, then double check the PPPOE username and password and the CVPI/VCI settings for the line. This light may blink a bit if there is traffic. This is ok.
The ethernet lights show when we have devices physically wired to the router
The image below shows a router that is on, has good dsl, and good internet connection lights. It also has a light on ethernet port 4, which is where I have connected the computer I used for configuration.
At this point, if the router says you are online, you can connect to the device via WiFi and surf the internet!
