Getting Started with Dreamweaver
Contents
Using Dreamweaver to type HTML pages
Dreamweaver Interface
Starting a project in Dreamweaver
Creating your first web page in Dreamweaver
Uploading your page to the server
Viewing the page you uploaded
Saving and loading your site in Dreamweaver
Saving your site to a thumb drive
Loading your site from a thumb drive
Downloading your site from the server
Introduction
Using Dreamweaver to Edit Web Pages
Dreamweaver is a program that basically does the same thing as Notepad, but has a lot more features.
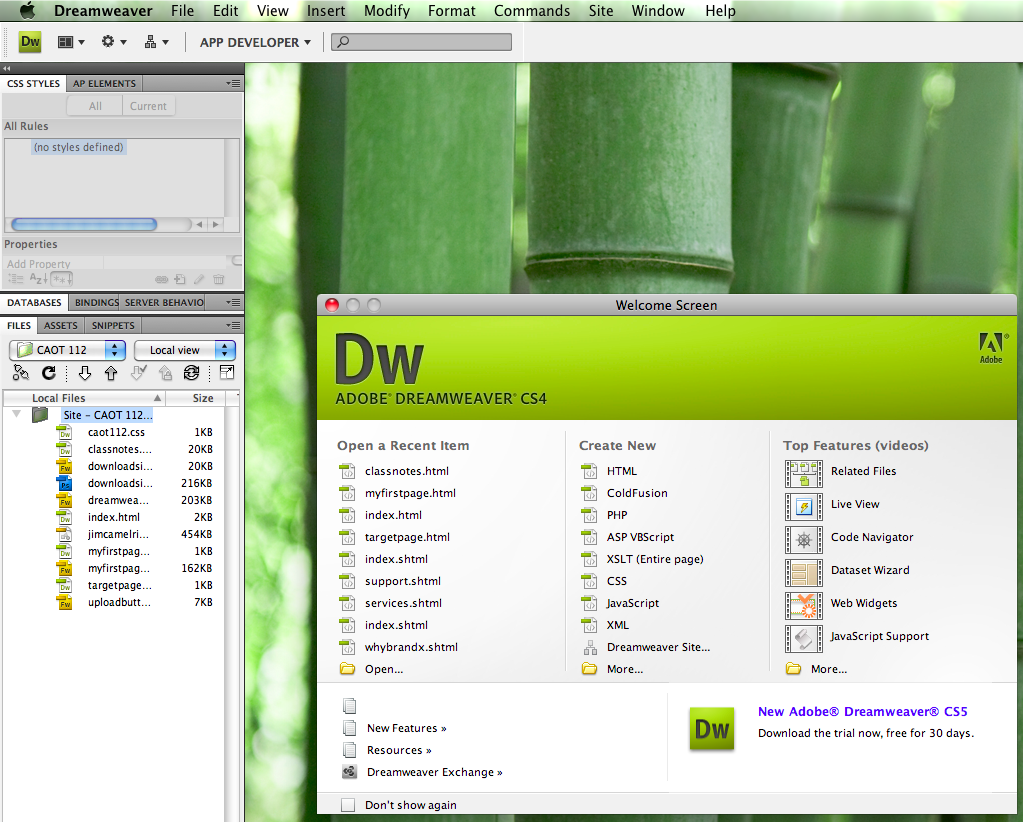
When you first start Dreamweaver, it brings up a "Welcome Screen" which you can usually ignore. That's the window at lower right with the Green banner that says "DW" in the picture below. You can click the red button to make it go away.
Dreamweaver Interface
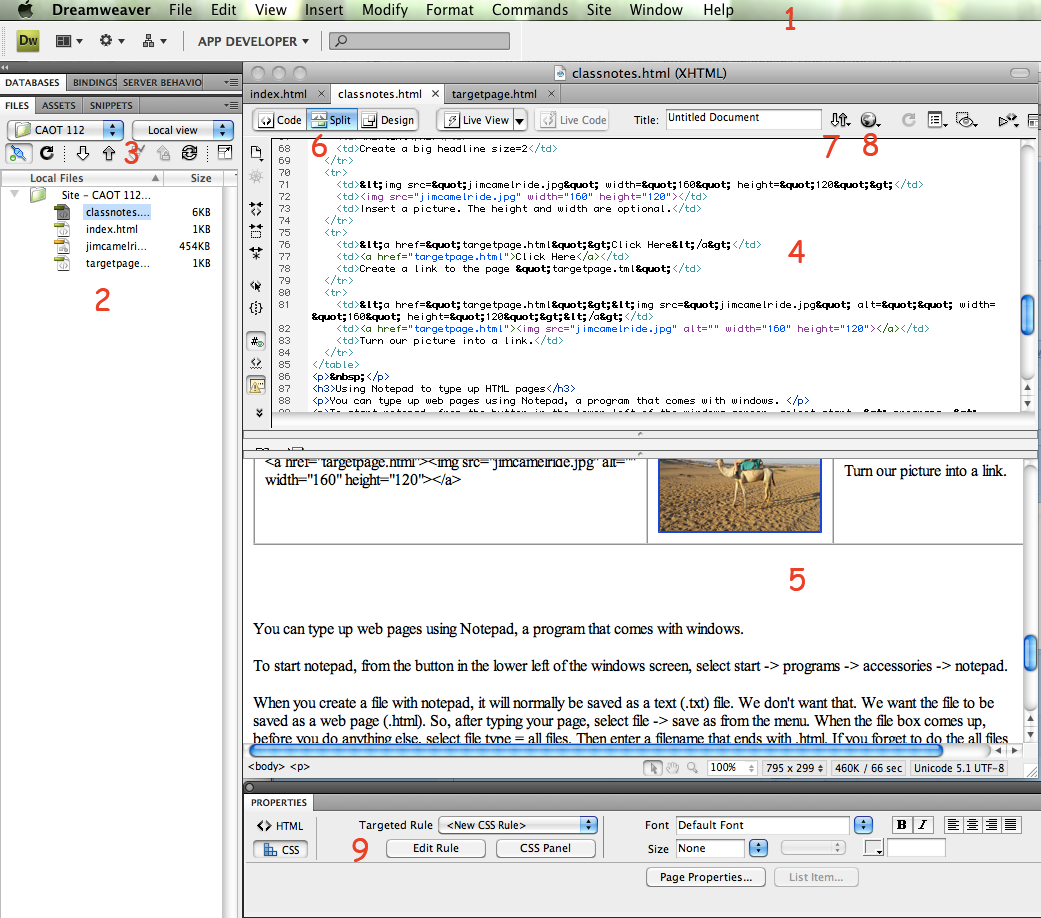
Before we try Dreamweaver, we need to understand where the various buttons and menus are. Then we can start a site and build a web page. Here's what the screen looks like for me right now, while I am working:
(click to enlarge picture)
You can see that I have a web site open, and I am editing a file called classnotes.html.
I have put some red numbers to indicate specific areas of the interface. Here's what they mean:
- Menu area: here you can find the file menu and other menus.
- File List area: here you see a list of files in your site. Up above were it says "caot 112" it shows the site you are currently working on.
- Upload and download buttons: click here to upload multiple files. If you don't select a particular file it will upload the whole site.
- HTML edit area. You can type html code here just like we did with notepad. Changes made here will be echoed in the preview area.
- Web page preview area. If you type here Dreamweaver will create matching html in the html edit area. Dreamweaver does a so-so job of this so you will want to save your html pages and then view them in a real web browser before finalizing your designs.
- Html view/Preview of web page/Split Screen buttons. You wan select which you want to see. Most of the time I use split screen.
- Upload or download this one file. For multiple files use the button at left that looks similar.
- There is also a litte earth button which will display the current web page in a browser.
- Options area. This is where you can set current formatting options.
Starting a Project in Dreamweaver
Before you build your web pages in Dreamweaver you need to create a "site" for your project. A site is a folder full of pages for a particular website. When you set up a site you need to tell Dreamweaver where to store your files (usually a folder in the docs folder) and you need to give it the server information so you can upload your site and make it visible to the world.
Each student will be assigned a folder on the server, with a URL, a username and password. You will need these. Let's get create a site:
From the "Site" menu choose "New".
The web server will ask you for a site name, and a URL. Hint It is often a good idea to open up your website in a web browser to make sure the URL is correct. Then you can copy the URL from the address window in the web browser.
For example, I could call my site "The Secret Lives of Plants" and the url could be "http://www.brandx.net/secretplants". In this class website might have URL's similar to this: http://www.brandx.net/lacc/caot112/spring2011/jimpickrell, but with your site name, not mine.
Here is a table showing all the questions:
| Question | Example | Explanation |
| Site name | The name of your site | My Trip to Egypt |
| URL | The web address of your site | http://www.brandx.net/lacc/caot112/spring2011/jimpickrell |
| Server Technology | None | For this class we will always say "none". |
| Edit local copies on my machine | Check | We will always edit on the local computer and then upload. |
| What folder on your server: | Use the default value |
Letting the computer choose the location usually works just fine. Usually this will be in a folder somewhere in the documents folder. |
| How to upload | FTP | We will always set this to FTP |
| Servername | www.brandx.net | For this class it's www.brandx.net but in the real world it's whatever the name is of your web space provider. |
| Folder | We will usually leave this blank | |
| Username | jimpickrell | Get this from your website provider. For this class you will get this from me (your instructor). Your username will not be the same as mine! |
| Password | f6rgewer | Get this from your website provider. For this class you will get this from me (your instructor). Your password may or may note be the same as mine. |
At each step along the way, you will enter some values and then click "next" to go to the next page. When you hit the page for ftp, be sure to use the test button to make sure that your servername, username and password, all work. The username and password are case sensitive.
When you are done, and you have successfully tested the username and password, then you are ready to start building pages.
If you have problems, here are some things to check: Make user you know which folder Dreamweaver is using on your computer to store the files, and make sure it makes sense. Do not save your files on the desktop. It will make a mess. Make sure you chose FTP as the way to upload files. Test the username and password again and make sure they work. If you want to go back and fix your settings you can choose "edit sites" from the "Site" menu and then edit the site setup you created.
Common error: Make sure that you haven't created multiple site definitions for the same site. A lot of students create multiple versions of the same site when they are having problems. Make sure you have only one site definition. Delete any duplicates to avoid confusion.
Creating Your First Page in Dreamweaver
OK, you have started a site and tested the ftp upload. We're ready to start.
Let's make a quick page and upload it and see if we can see it.
Select file -> new
From the "New Document" window that comes up select "html" for type and "none" for template. Click "Create". This starts a new page, but we haven't named it yet.
Make sure we are in split screen mode. In the image earlier on where we discussed the interface, this is set in area number 3. Refer to that diagram and you will see what I mean.
In the document window, in the preview area (see my diagram, it is labeled #4) type the following:
hello world
Dreamweaver will create matching html for this. The html portion of the split screen will look like this:
<!DOCTYPE html PUBLIC "-//W3C//DTD XHTML 1.0 Transitional//EN" "http://www.w3.org/TR/xhtml1/DTD/xhtml1-transitional.dtd">
<html xmlns="http://www.w3.org/1999/xhtml">
<head>
<meta http-equiv="Content-Type" content="text/html; charset=UTF-8" />
<title>Untitled Document</title>
</head><body>
hello world
</body>
</html>
Notice that Dreamweaver has created a bare bones template for the page. The page will work without this stuff, but this is the right way to do things, so that's just fine.
Let's save our file locally and give it the name "myfirstpage.html". Use file -> save to save the file and give it the name. You have already determined where to put the files when you created the site definition. There is an asterisk next to the filename in the document window. If you saved it then this asterisk goes away.
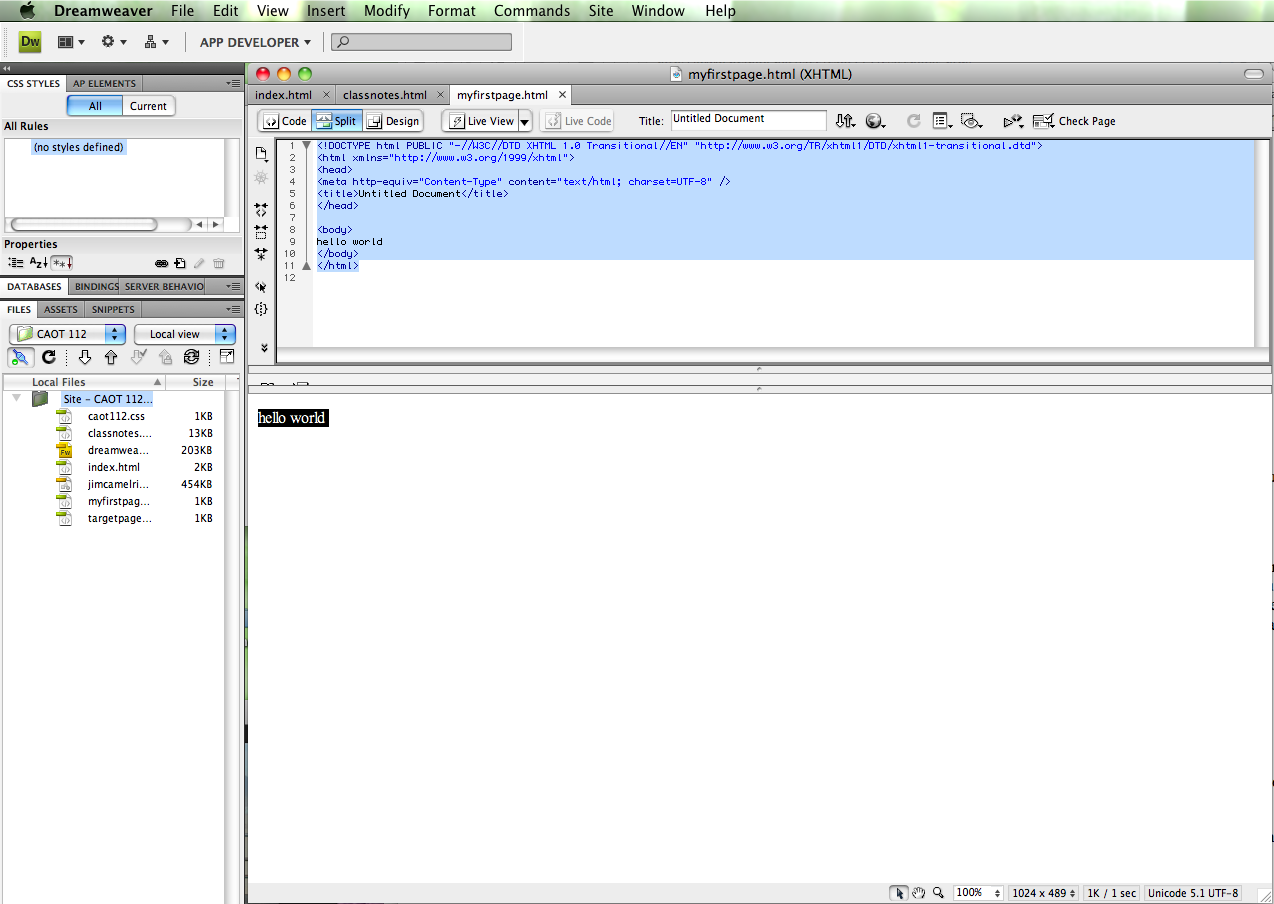
Here's what my screen looks like after creating this page. Your screen should look somewhat similar, though you won't have as many pages as I do:
Look this diagram over carefully. Do you see the HTML area, the document Preview area below it, and the list of files on the left side?
Uploading your page to the server
Now let's upload the page. Click the upload button, which looks like this: ![]() and from the menu that comes up, choose "put".
and from the menu that comes up, choose "put".
If you haven't saved your file, the computer will ask you if you want to save your file, and then computer will ask you if you want to upload dependent files. These are files like pictures that are part of your web page. We don't have any pictures so in this case the answer is no. If you say yes, it will attempt to upload those dependent files (pictures) when it uploads your page.
The server should upload the file fairly quickly. If there are problems, go back to your site definition and check the ftp settings: server, username and password.
Excellent. We have uploaded the page.
Viewing the page you uploaded
Explorer will let us look at the page if you put the address in the address bar. My page could be at the following address:
http://www.brandx.net/lacc/caot112/spring2011/jimpickrell/myfirstpage.html
Your should be something similar. If you can't get it right, try going to http://www.brandx.net/lacc/caot112/ and then click on "student pages" and navigate to your web page.
Excellent! We have set up and tested Dreamweaver.
Saving and Loading your site
Normally we work on the hard drive, and every time we make changes we save them. When you come back to your computer you can just open Dreamweaver and pick up where you left off last time. Double click on files in the file list at left and you can work on them.
If you are working in the lab at LACC, the computer gets wiped every time it is restarted. This means you need to save your files elsewhere. If you upload your files to the server you can download them again next time you come to the lab and then continue your work. Alternately, if you have a thumb drive you can copy the whole site to the thumb drive for use next time. I will show you both ways to save and retrieve your site.
Saving your site to a thumb drive
Start the Site Manager with "Site -> Manage Sites" from the menu. Select the site you want to transfer in the left list box by clicking it once. If you have only one website, that site should already be selected.
Click the "Export..." button. A dialog box with a title "Exporting site" (followed by your site name) will appear. Make sure that the radio box for "Back up my settings (includes login, password, and local paths)." is selected, and click the "OK" button.
In the "Export Site" dialog box that follows, locate your USB thumb drive or external hard disk. By default, Dreamweaver will set the filename of your exported settings to the name of your site followed by a ".ste" extension. For example, if you named your site "The Site Wizard", the suggested filename will be "The Site Wizard.ste". I recommend that you leave the filename to the name Dreamweaver suggests, unless you have some special reason to want to change it. You should probably leave the extension set as ".ste" so that Dreamweaver recognizes it on your new computer as a site definition file. Memorize the name (or write it down somewhere) so that you can find it later, and click the "Save" button.
Loading your site from a thumb drive
- Attach your thumb drive to the computer. Drag your website folder from that drive to a location of your choice on your new computer. If you don't know where on your new computer to put it, just drag the folder onto your Desktop.
- Start up Dreamweaver.
- Click the "Site -> Manage Sites..." menu item.
- The Site Manager should appear. Since this is the first time you're starting the Site Manager on this computer, the list of sites you normally see on the left side of the box should be empty. Click the "Import..." button.
- The "Import Site" dialog box will appear. Locate the site definition file that you exported earlier (the one with the ".ste" extension that I told you to memorize or note down earlier), click it once to select it, and click the "Open" button.
- You will probably get another dialog box immediately after you do that. This dialog box will have a title of "Choose local root folder for site [your-site-name]", where "[your-site-name]" is the name of your site. Locate the folder that you just copied to your computer. If you followed my suggestion above, it should be on your desktop. (Important: I'm referring to the folder you just copied onto your Desktop, not the temporary copy on your USB flash drive.) Click it once to select it, then click the "Open" (or "Select") button. It's possible that Dreamweaver will open the folder instead of selecting it, and present you with another dialog box with a "Select" button. Just click the "Select" button this second time round.
- You will then be returned to the Manage Sites dialog box, with your website listed on the left.
- Click the "Edit" button to invoke the Site Definition and browse through all the settings to make sure that everything was carried over correctly. In particular, make sure that the folder Dreamweaver is using, is correct. If it's not, go back and fix it (Site -> Manage Sites)
- Continue to click the "Next" button, checking all the settings, until you reach the window with the "Done" button. Click it. Dreamweaver will then update all your site files and settings before returning you to the Site Manager screen again. Click "Done".
- If you have set the folder name correctly, you should be able to see your website files listed in the FILES panel in the bottom right column of the Dreamweaver window. (You may have to click the "+" beside your site name in that panel to expand the list of files.)
- If you don't see your web pages there, but either see an empty list or a list of files not belonging to your website (like all your desktop icons and shortcuts), the folder name was probably not entered correctly. Invoke the Site Manager again, click the "Edit" button, followed by the "Next" button until you get to the window with the folder name, and fix it there. When you're done, remember that you must click the "Next" button till you reach the last screen, followed by the "Done" button after that. (That is, do not dismiss the Site Manager by hitting the ESC key or the "X" close button on the top of the dialog box, or you may lose the changes you've made.)
Once you've done the above, you should be able to work on your web pages as you did last time. Be sure when you get done working, you will need to save the whole thing to the thumb drive again.
(thanks to mysitewizard.com for part of this explanation)
How to download your site from the server
If you have not saved your site to a thumb drive, you can download it from the server. Set up your site in the site manager as explained above when we created a new site. When you are done you should have the site folder, location, server, ftp username and password and so on all set, but you won't have any files in your site.
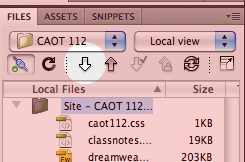
Now, click on the download site button. The it's the downward pointing arrow button in the following diagram:

When you click this button, the entire site will be downloaded, including all files. Have a look at the file list on the left side of the screen. is everything there? If so, you are ready to start work.


